
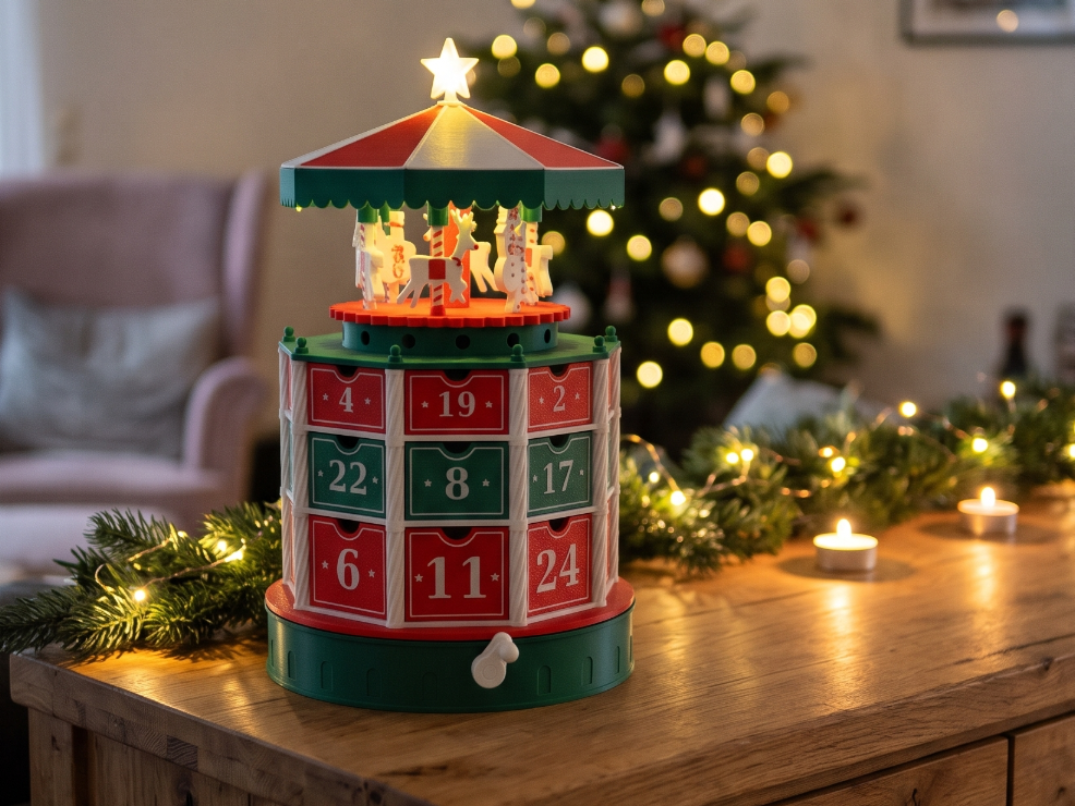
Advent Calendar Carousel
Peso
2269g
Tiempo
65h 35m
Precio
Pregunta por WhatsApp por este modelo o uno similar
Te ayudamos a conseguir este diseño o uno parecido, con precio según color y acabado
Las dimensiones dependen del diseño. Confirmamos las medidas exactas por WhatsApp.
Este diseño es de su creador en MakerWorld y se muestra solo como referencia. Tecnoprints no es dueño del modelo ni de su licencia.
Descripción
A carousel that counts down to Christmas Turn the crank and the whole tower spins: 24 numbered drawers ride around, the reindeer, horses and snowmen bob up and down, and a glowing star crowns the tent roof. Crank today's drawer to the front, open it, done. The calendar stands about 38 cm tall and 23 cm wide. It prints on any 256 × 256 mm printer without a single support, and the AMS only switches colours in the first and last three layers of the drawer fronts and figures. Everything else is printed in one colour and plugged or glued together. Highlights 24 drawers in three sizes. Bottom row 51 mm tall for small gifts, middle 41 mm, top 33 mm for chocolates. Day 6 (St. Nicholas) and day 24 sit in the big bottom row. Hand-cranked drive. A side crank turns a 17-tooth pinion into a 102-tooth crown gear under the turntable (6:1). Three quarters of a crank turn moves the carousel one drawer. Bobbing figures. A stationary axle runs up through the tower and holds a wave cam still while everything around it turns. Six riders on candy-cane poles rise and fall 10 mm, three waves per revolution. Built-in lighting. A micro LED string runs through a hidden light channel and ray grooves under the canopy; three LEDs glow inside the hollow star. Hidden battery with magnetic service hatch. The battery box sits inside the roof. One roof panel lifts off on magnets to press the timer button or swap batteries. Print-friendly. No supports, 18 ready-made plates in the 3MF, colours pre-assigned. Gears have 0.45 mm backlash and every fit was checked in a full collision simulation. What you need About 2.1 kg of PLA in three colours (plus 2 g for the star), plus a few non-printed parts. Any colours work; the files carry no colour, so swapping is one click in the slicer. Jade White is more translucent than Matte Ivory and makes the star glow much better. Hardware Micro LED string, battery powered, 20 LEDs at 10 cm spacing, about 2.3 m long with a lead of about 35 cm, warm white, with a 6/18 h timer (on 6 h, off 18 h, repeats daily). The box must fit 80 × 35 × 20 mm. I used a CEPEWA micro string (AA version with timer: 227 cm, 37 cm lead, box 78 × 33 × 18 mm). Avoid coin-cell boxes: they only last a few evenings. 2 × AA batteries for the string. 6 neodymium magnets, 3 mm × 2 mm (three pairs for the hatch). Gel superglue (cyanoacrylate). A dry lubricant spray (e.g. Ballistol ceramic dry lube or WD-40 Specialist dry lube) for the support rail, centring lip and cam track; a plain paraffin candle rubbed on works too. Print settings and plates Open the 3MF as a project, map the four slots to your AMS spools and print plate by plate. 0.20 mm layer height, 0.20 mm first layer (the colour inlays are exactly 3 layers = 0.6 mm). 3 walls, 15 % infill (Bambu default pattern); the roof core uses 10 %. 4 walls for the gears (turntable on plate 2; pinion, axle and crank shaft on plate 3) and a 5 mm outer brim for the centre column. All of this is already set in the 3MF, per plate and per object. No supports anywhere. Use a 0.4 mm nozzle; Sparkle PLA must not go through a 0.2 mm nozzle. Smooth PEI gives the drawer fronts and roof panels a glossy face. Print the figures (plate 13) with care. Antlers, legs and the small colour details at the outline are delicate. Wash the build plate with dish soap first and keep fingerprints off it, watch the first layers, add a narrow brim if small parts tend to lift on your plate, and flex the figures off gently. Colour changes only happen on plates 7, 8, 9 and 13. Enable “Flush into objects' infill” to save purge material. Tip: print plates 1 to 3 and 11 first and test the drive before committing to the big parts. Assembly The illustrated 11-page step-by-step guide (PDF, English and German) is also embedded in the 3MF under Project → Assembly Guide. Grey parts are already assembled; coloured parts are new and shown in their installed orientation. Drive and turntable Pre-assemble the crank. Slide the pinion onto the inner end of the octagonal crank shaft (teeth inwards, hub towards the housing wall) and the crank onto the outer end. Add a drop of glue if they sit loosely. Drop the shaft into the housing. Lay it from above into the two U-slots: the inner bearing block and the housing wall. Pinion inside, crank outside. Glue on the bearing caps. Fit both caps dry first; the crank must turn freely. Then add a drop of gel glue on top of the bearing block (inner cap) and on the two rib tops next to the wall slot (outer cap). Keep glue out of the curved saddle above the shaft. The outer cap continues the wall profile, so the slot disappears. Insert the axle. Push the long octagonal axle upright into the socket in the centre of the housing. It stays still and never turns. Place the turntable. Lower the turntable, gear teeth down, over the axle until the crown gear meshes with the pinion. The centring lip under the turntable slips around the rail and keeps the carousel from shifting while you crank (0.2 mm play). Turn the crank: it should run easily. Insert the dowels. Push the 8 short dowels into the holes around the turntable rim. Tower Stack the tiers. Thread tier 1 (tallest drawers), tier 2 and tier 3 over the axle. The pins on top of each pillar locate the next tier. Slide in the drawers. Red drawers in tier 1, green in tier 2, red in tier 3. Every drawer fits every bay of its tier; the tapered end points inwards. Add the stage plate, ring wall up, onto the pins of tier 3. Fit the cam disc onto the end of the axle (octagonal blind hole), wave track up. It rests on the axle only and stays still. Recommended: before fitting, smooth the wave track with fine sandpaper (240 to 400 grit) so the pole tips glide over the layer lines, then remove all sanding dust. Once all glue work is done, dab a little dry lubricant onto the wave track, support rail and centring lip with a cotton bud; never spray onto the carousel. Add the figure deck onto the six pins of the ring wall. From now on it turns with the tower. Carousel and roof Insert the figures. Drop the poles through the six deck holes until the tips rest on the wave track. Order around: reindeer, snowman, horse, reindeer, snowman, horse, all facing outwards. Fit the centre column onto the octagonal hub of the deck. Install the lighting (next section) and place the canopy, scalloped valance down, over the column. Guide the six pole tops into the funnel-shaped sleeves; tilting the poles slightly helps. Prepare the roof. Glue the three red and four ivory panels alternately into the recesses of the roof core, smooth bed side out. The fourth red panel is the service hatch: do not glue it. Set the roof on the canopy so the three roof dowels engage. Turn it so the hatch sits above the column of drawers with day 24 – easy to remember. Close the star. Glue the two hollow halves back to back around the last three LEDs and push the star into the slot on the roof tip. Lighting installation With a 20-LED string (37 cm lead, 10 cm spacing), 16 LEDs light the carousel from under the canopy, 3 glow inside the star and 1 stays hidden in the roof. Everything from the figure deck up turns together, so battery, string and star rotate as one and nothing twists. All threading is done with the free end of the string; the battery box never has to pass through a hole. Down through hole A. Hold the canopy upright and push the free end down through hole A (the two holes sit next to each other near the centre). Pull the string through until only the lead to the battery box is left on top. Light channel. Turn the canopy over. Lead the string from hole A along its ray groove to the rim, through the gap in the lip, and press it into the channel behind the lip all the way around. Six LEDs end up here, hidden from outside by the valance. Light rays. Come back out through the same gap and press the string into the zig-zag ray grooves. Ten LEDs light the riders from above. A tiny dot of glue every few centimetres keeps it in place. Up through hole B and place the canopy on the column (assembly step 14). Battery box. Set the box on the canopy, centred over the column, long side pointing to the hatch side and the timer button facing the hatch. Into the roof. From the underside of the roof core, thread the free end up through the 4 mm channel and out of the star slot. Lower the roof over the box; the spare string coils up in the cable space above it. Pull gently until three LEDs sit in front of the slot, then glue the star halves around them. Magnets. Press three magnets 1 mm deep into the hatch pockets (a drop of gel glue each); they stick out 1 mm and also centre the hatch. Snap a second magnet onto each one – now the polarity is right. Put a small drop of glue into each of the three holes in the roof and press the hatch into place. Let it cure, then lift the hatch: the counterpart magnets stay in the roof. Switch on. Press the timer button at the time the lights should come on each day, e.g. 4 pm for 4 pm to 10 pm. Replace the hatch. Changing batteries: lift the hatch at the small finger notch in the bottom edge, slide the box out through the opening (the lead has about 33 cm of slack for this), swap the batteries and slide it back. Personalise it (Customizer) Click Customize on the model page to make your own versions right in the browser: Drawers: one drawer or a full set of 8 for any tier, with your own labels instead of numbers – names, initials, letters. Short labels (up to 2 characters) get the little stars; long texts shrink automatically to fit. Nameplate: a plaque for the round base, e.g. “Emma's Advent Calendar” or “Christmas 2026”, with one or two lines. Its back follows the curve of the base; glue it on anywhere between the foot ring and the top bead. For two colours, export the part Body and then the part Inlay, load both files together as one object with two parts and assign the colours. Everything comes out in print orientation, front face on the bed, no supports. Tips and FAQ The crank feels stiff. Add a little dry lubricant to the support rail, centring lip and wave track. Check that the bearing caps sit dry without pressing on the shaft. A fit is too tight. Clearances are 0.25 to 0.4 mm for plug-in joints and 0.45 mm gear backlash. Very tight printers may need a light sanding. The figures stick. The pole tips slide on the cam: sand the wave track smooth, clean off the dust and add a little dry lubricant. Make sure each pole is square to its sleeve. Close all drawers before cranking. A fully opened bottom drawer can touch the crank. My LEDs land in the wrong place. Adjust the slack between the battery box and hole A until the last three LEDs sit in the star. Different strings shift everything by a few centimetres. Will a different LED string work? Yes, if the battery box fits 80 × 35 × 20 mm and the LED spacing is around 10 cm. Choose a 6/18 h timer: a plain “6 h timer” may only switch off. Can I skip the lighting? Yes. Leave the hatch closed and glue it like the other panels; the grooves stay invisible. The timer drifts. Simple timers are not clock-accurate. Switch the string off and on again at the desired time. Safety and notes Not a toy for small children. It contains small parts and neodymium magnets, which are dangerous if swallowed. PLA softens at about 55 to 60 °C. Keep the calendar away from radiators and direct sun. PLA prints are not food safe. Put only wrapped sweets into the drawers. Use only the batteries specified for your LED string.
Tags
Diseñador
thevaan