
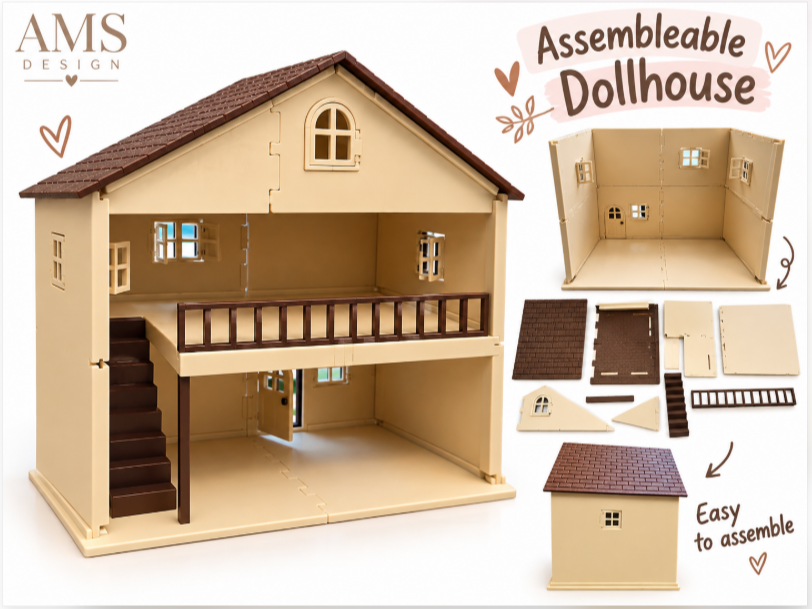
Modular Dollhouse – Easy Assembly & Moving Parts
Peso
1047g
Tiempo
28h 8m
Precio
Pregunta por WhatsApp por este modelo o uno similar
Te ayudamos a conseguir este diseño o uno parecido, con precio según color y acabado
Las dimensiones dependen del diseño. Confirmamos las medidas exactas por WhatsApp.
Este diseño es de su creador en MakerWorld y se muestra solo como referencia. Tecnoprints no es dueño del modelo ni de su licencia.
Descripción
🏡 Modular Dollhouse – Build Your Dream Home! Welcome to this adorable, spacious, and fully assembleable 3D-printed dollhouse, designed with love by AMS Design! ❤️ This charming two-story house features a beautiful textured roof, an interior staircase, a balcony railing, and functional doors and windows. It's a lovely DIY project for miniature enthusiasts, dollhouse collectors, and anyone who enjoys building something special! ✨ Features 🏠 Spacious two-story design – this is not a tiny miniature! Check out the photos with my hand to appreciate its actual size. 🧩 Easy assembly – separate pieces fit together to create the complete house. 🚪 Functional hinged doors that open and close. 🪟 Functional hinged windows that can be opened and closed. 🪜 Interior staircase connecting the two floors. 🤎 Beautiful textured roof and charming architectural details. 🎨 Customize your dollhouse with your favorite filament colors. 🖨️ All 15 pieces are designed to print without supports. 📏 Dimensions Width: 309 mm Depth: 206 mm Height: 297 mm Base size: 300 × 200 mm The house is approximately 30 cm tall! 🔧 Assembly Instructions – Step by Step IMPORTANT: GLUE IS REQUIRED FOR A STABLE ASSEMBLY! Although the pieces are designed to fit together easily, the connecting panels and structural joints need to be glued to ensure the completed dollhouse stays secure and stable. Step 1 – Assemble the Base Connect the two base halves using their dovetail joints. Check their alignment and glue the joint to secure the base. Step 2 – Install the Left Wall Insert the left side wall into its designated groove in the base. Step 3 – Assemble the Back Wall Connect the two back wall sections together on a flat surface. Carefully slide the assembled back wall into the base groove and the guide on the left wall. Step 4 – Install the Right Wall Slide the right side wall into its groove, connecting it with the back wall. Step 5 – Install the Front Support Post Insert the support post into its designated slot in the base, next to the staircase. Step 6 – Assemble the Upper Floor Connect the two upper-floor panels using their tongue-and-groove joints. Slide the assembled floor into the supporting rails from the front until it reaches the support post. Step 7 – Install the Balcony Railing Carefully insert the balcony railing into its five designated slots. Step 8 – Assemble the Front Gable Connect the two triangular gable sections and insert the assembled gable into the slots at the top of the front pillars. Step 9 – Install the Roof Position the left roof section first, followed by the right roof section. Align the connecting surfaces carefully. Step 10 – Install the Staircase Insert the two staircase pins into their designated mounting holes underneath the upper floor. Your beautiful dollhouse is now assembled! 🏡❤️ ⚠️ IMPORTANT – Gluing and Moving Parts Glue is necessary to keep the house securely assembled! Test-fit all pieces before applying glue. Apply glue to the connecting structural panels and joints where needed. Make sure all walls and floors are correctly aligned before the glue dries. DO NOT glue the doors, windows, or their hinges! All doors and windows are designed to remain functional. After printing, gently move each door and window back and forth a few times to release the print-in-place hinges. Handle the hinges carefully to avoid damaging the small moving parts. 🖨️ Printing Recommendations Material: PLA Nozzle: 0.4 mm Layer height: 0.24 mm Walls: 2 Infill: 10% Gyroid Supports: Not required Recommended elephant foot compensation: 0.15 mm All individual pieces fit on a 256 × 256 mm build plate. Estimated total printing time: 15 hours and 47 minutes, based on the original Bambu Studio X1C settings. Actual printing time may vary depending on your printer and settings. 💕 A Little Home Full of Possibilities! Leave the rooms empty, decorate them with miniature furniture, or create your own little dream home! This dollhouse is a fun building project and a beautiful display piece once assembled. I hope you enjoy printing, assembling, and customizing it as much as I enjoyed creating it! ❤️ Designed with love by AMS Design 🚀 If you enjoy my creations, please consider leaving a Like, sharing your printed results, or giving this model a Boost! Your support means so much and helps me continue creating new designs. Happy printing and happy building! 🏡💕 Membership❤️ **Support AMS Design – Join My Commercial License!** Love my creations? Join my membership to support my work and get a commercial license to sell physical 3D prints of my designs! 🏡✨ Your support helps me keep creating new, beautiful, and functional models. Thank you for being part of my creative journey! 💕 Boost Me🏡✨ Build your own little dream home! This spacious modular dollhouse features working doors and windows, a staircase, and a beautiful textured roof! Easy to assemble and full of charming details. ❤️ If you love my design, please give it a Boost! 🚀💕 Thank you for supporting AMS Design!
Tags
Diseñador
anasap