
Gobble 'Til You Wobble – Thanksgiving Turkey
Peso
622g
Tiempo
41h 2m
Precio
Cotiza este producto por WhatsApp
Contáctanos y te damos el precio según color y acabado
Las dimensiones dependen del diseño. Confirmamos las medidas exactas por WhatsApp.
Descripción
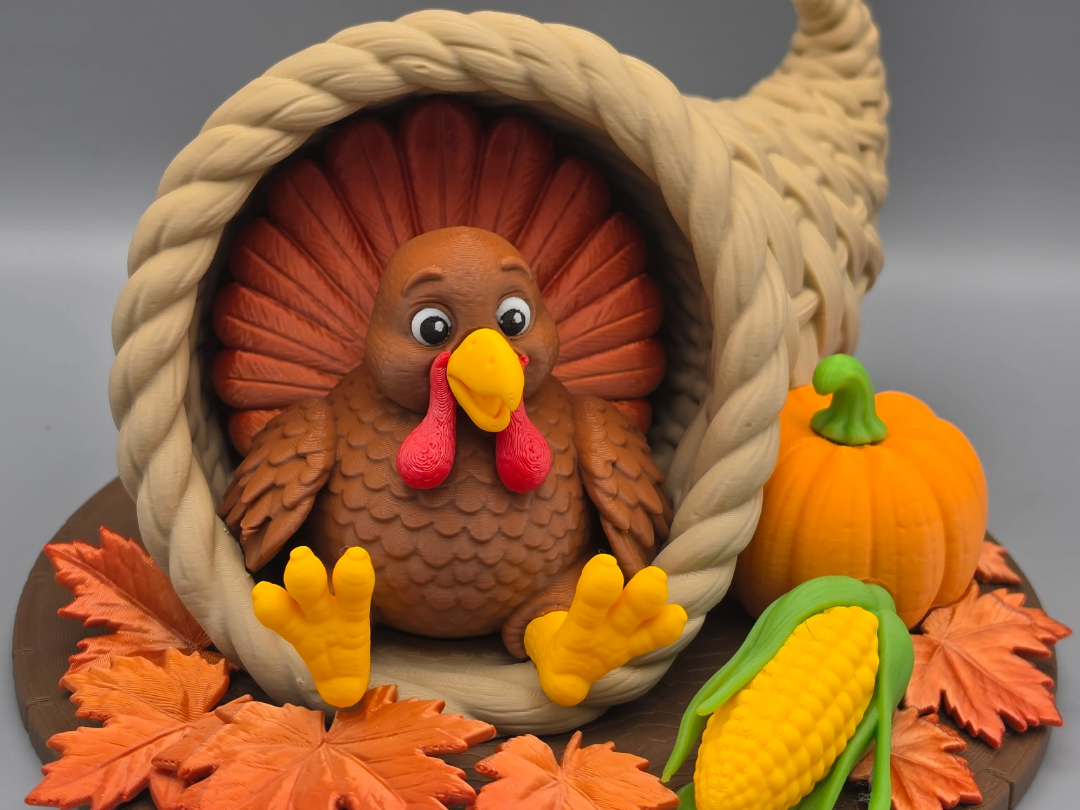
Membership💼 Want to sell prints of my designs? Join the Zesty3DbyArt Commercial Seller Membership and gain commercial rights to sell physical prints of eligible models. Your membership also helps support future releases, testing, and new creations.A Little Turkey, a Lot of Personality, and a Cornucopia Full of Fall Fun! 🍁🌽🎃 Meet Gobble 'Til You Wobble, the happiest little turkey to ever find himself stuffed inside a cornucopia! 😂🦃 With his big goofy eyes, cheerful expression, bright yellow feet, and colorful tail feathers, this little guy looks like he's having the time of his life. Apparently, nobody told him what usually happens to turkeys around Thanksgiving! Nestled inside an oversized woven cornucopia and surrounded by a plump pumpkin, golden corn, and scattered autumn leaves, this adorable Thanksgiving diorama captures everything we love about fall—warm colors, harvest traditions, and a little bit of silliness. Whether you're decorating your Thanksgiving table, adding to your fall collection, or just looking for a fun seasonal print, this little turkey is ready to bring some smiles to your holiday display! 🍂 A Thanksgiving Scene Full of Personality This multipart diorama features: 🦃 An adorable, wide-eyed turkey with a big personality 🪶 Beautifully detailed tail feathers that fan out behind him 🧺 An oversized woven cornucopia with a thick braided opening 🎃 A cheerful harvest pumpkin 🌽 A bright ear of corn with leafy green husks 🍁 Scattered autumn leaves 🪵 A detailed circular display base that brings everything together The combination of rich autumn colors, playful character design, and textured details makes this a fun little centerpiece that looks great from just about any angle. Approximate assembled size: 150 mm, consistent with my other seasonal diorama models. 🎨 NO AMS REQUIRED! (But It Can Help!) This model has been designed as a multipart print, allowing you to print the different components in their individual colors without needing an AMS. The only parts that can benefit from AMS are the turkey's main body and eyes, where multicolor printing can give you a cleaner, more detailed finished look. No AMS? No problem! Print the pieces separately and paint the eye details yourself. Feel free to experiment with your own fall color combinations. Traditional oranges, browns, reds, and yellows look fantastic, but there's nothing stopping you from creating a turkey with a little extra flair! 🧩 IMPORTANT – ASSEMBLY ORDER Please read this section before assembling! Unlike some of my other dioramas, this one has a specific assembly sequence to ensure everything fits together correctly and gives you the cleanest finished result. I strongly recommend dry fitting all parts before applying glue. STEP 1 – Assemble Your Turkey 🦃 Start by assembling the turkey separately before placing him into the cornucopia. Attach the head and body components. Install the tail feathers. These are designed to snap into place, but I recommend adding a little glue to keep them secure during the remaining assembly. Attach the beak and feet. These pieces do not require glue. Leave the two red wattle pieces off for now! These will be installed toward the end. Once your turkey is assembled, allow the glued pieces the ability to fully dry then you're ready to bring the scene together. STEP 2 – Place the Turkey Inside the Cornucopia 🧺 Carefully position your assembled turkey inside the cornucopia, fitting him into the designated cutout. Make sure he's properly seated and aligned before moving to the next step. STEP 3 – Secure Everything to the Base 🍂 With the turkey positioned inside the cornucopia, locate the hole underneath the turkey and align it with the corresponding peg on the display base. Carefully bring the turkey, cornucopia, and base together. These three main components are designed to snap together and create a solid, secure connection. No glue should be necessary on the bottom of the cornucopia! Once everything is properly aligned and snapped into place, the main structure should be held securely together. STEP 4 – Add the Finishing Touches 🎃🌽 Now that your turkey and cornucopia are securely positioned, it's time to bring the harvest scene to life! Attach the two red wattle pieces to the turkey's face using a small amount of glue. Position the pumpkin in its designated location with glue. Add the ear of corn with glue. Arrange and secure the autumn leaves in their respective positions with glue. Adding the wattles last makes the earlier assembly steps easier and helps prevent accidentally knocking them loose while positioning the turkey. And just like that, your Thanksgiving masterpiece is complete! 🧡 Make It Your Own! One of my favorite things about these seasonal dioramas is seeing how different filament colors can completely change the finished look. Try a rustic farmhouse palette, bright traditional Thanksgiving colors, or even a slightly cartoonish combination to make your turkey stand out. And remember, dry fit first, glue where recommended, and most importantly, have fun with it! This little turkey may have gotten himself stuck in a cornucopia, but at least he's surrounded by good company, colorful leaves, and plenty of corn. Let's just hope nobody invites him to Thanksgiving dinner! 😂🦃 Happy Printing, Happy Harvest, and Happy Thanksgiving! 🍁🎃🌽 — Zesty3DbyArt
Tags
Diseñador
Zesty 3D by Art