
Pumpkin Pals – Bat & Spider Inserts + Stencils
Peso
125g
Tiempo
7h 49m
Precio
Pregunta por WhatsApp por este modelo o uno similar
Te ayudamos a conseguir este diseño o uno parecido, con precio según color y acabado
Las dimensiones dependen del diseño. Confirmamos las medidas exactas por WhatsApp.
Este diseño es de su creador en MakerWorld y se muestra solo como referencia. Tecnoprints no es dueño del modelo ni de su licencia.
Descripción
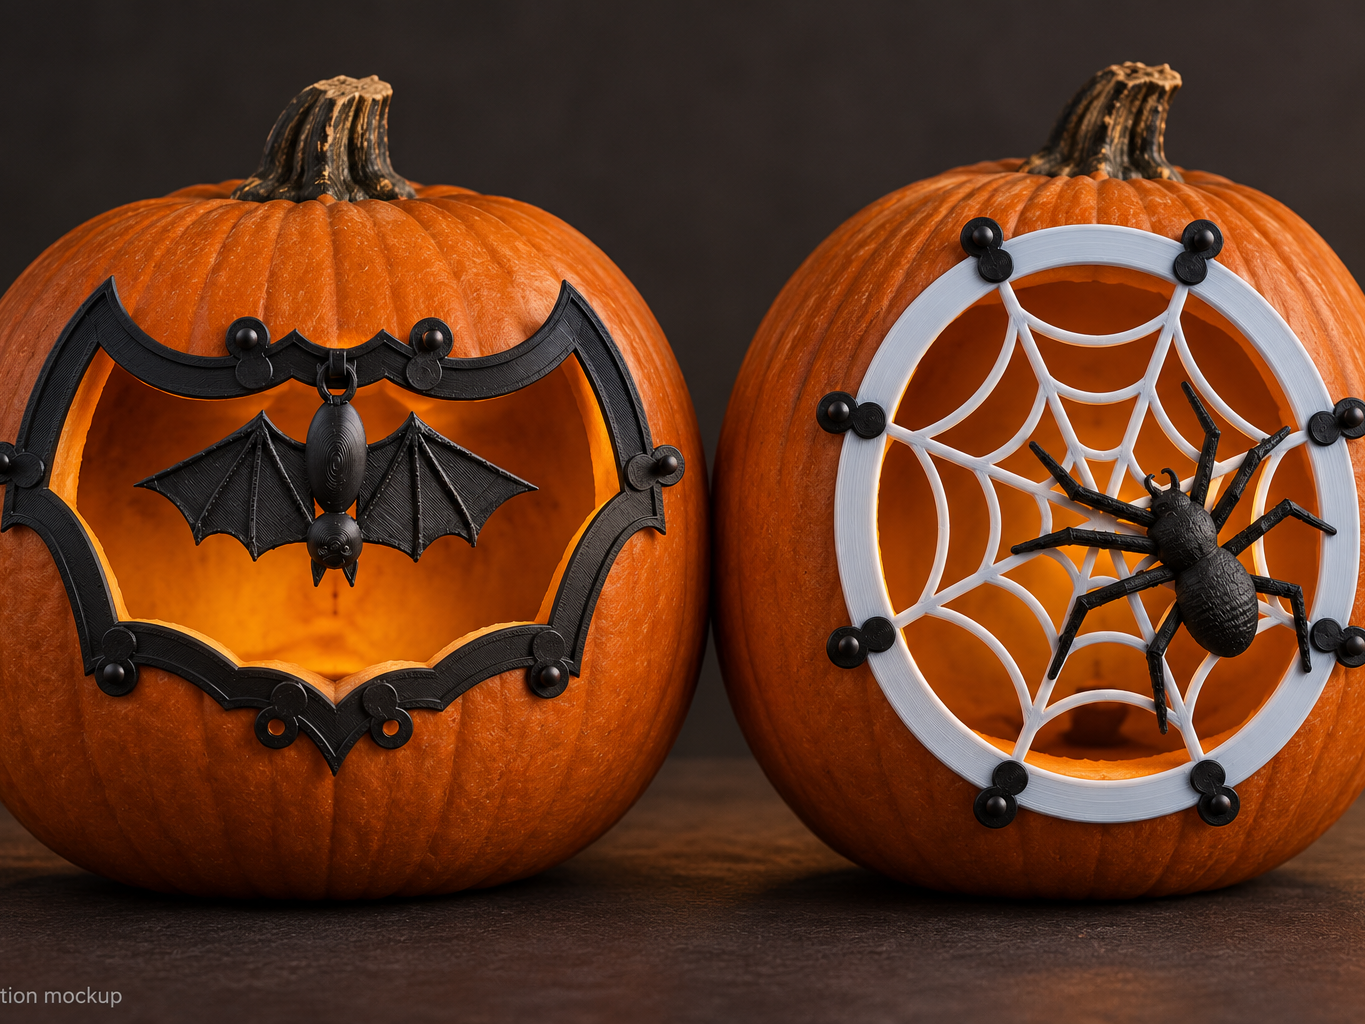
Pumpkin Pals 🎃 Halloween Pumpkin Inserts & Carving Stencils Pick your pal, carve your pumpkin, and give your jack-o’-lantern a little extra character! Pumpkin Pals combine real pumpkin carving with reusable 3D-printed details. Choose a hanging bat inside a wing-shaped frame or a raised spider on an open web. Each design includes a matching dotted carving stencil and printable barbed mounting nails. Meet the Pals 🦇 Bat Cavern A wing-shaped outer frame with a separate hanging bat. The bat hangs from the frame’s hook, adding depth and character to the carved opening. 🕷️ Spider Den A raised spider on an open web. The relatively thin web allows some gentle flex when positioning it against your pumpkin. How to Use Print: Print your chosen insert, matching stencil, and mounting nails. Position: Place the stencil against a broad, relatively flat area of your hollowed-out pumpkin. Press: Gently press the points into the skin. Carefully rock the stencil as needed without shifting its position. Check: Lift the stencil away and hold the decorative insert over the marks. Make sure the rim covers the marked line and every mounting hole sits over intact pumpkin. Carve: Follow the dot centers, cutting conservatively and checking the fit as you go. Mount: Position the insert and gently press the barbed nails through its mounting holes. For Bat Cavern, hang the separate bat from the hook. Light: Add a battery-powered LED inside your pumpkin! The stencil marks the carving line, not the outside edge of the decorative frame. The frame overlaps the opening, while the outward mounting tabs sit on intact pumpkin. What’s Included Bat Cavern kit Wing-shaped frame with a hanging hook Separate hanging bat Matching dotted carving stencil Printable barbed mounting nails Spider Den kit Open web with a raised spider Matching dotted carving stencil Printable barbed mounting nails Separate complete-kit print profiles let you choose your favorite design. Printing Notes Single-color printing—no AMS required Print the decorative pieces with their flat backs on the build plate Print stencils with their flat backs down and points facing upward Print nails with their heads on the build plate Use matching versions of each insert and stencil Both designs have been physically printed. Pumpkin curvature and wall thickness vary, so always check the fit before carving. Choose a broad mounting area and avoid forcing the frame or raised details against a tight curve. Resize to Fit Your Pumpkin Pumpkins come in all shapes and sizes! Scale each kit up or down in your slicer to suit your pumpkin. Resize the decorative insert and its matching stencil by the same percentage. For Bat Cavern, resize the hanging bat by that same percentage so its loop stays matched to the frame’s hook. Tip: Scale only the X and Y dimensions, keeping Z unchanged to preserve the frame thickness, raised details, and marking-point height. Keep X and Y proportional, and resize parts in their supplied printing orientation. Resizing changes the mounting-hole diameter. If resizing the nails, match their X/Y scale to the insert while leaving Z unchanged to retain their length. Check the nail fit—and the bat’s hook-and-loop fit—before printing the full kit. When reducing the size, check the sliced preview to ensure thin connections, web strands, and marking points still print clearly. Before carving, hold the insert over the stamped marks to confirm coverage and mounting clearance. NEW: Longer 5 mm Marking Points Two optional add-on plates include the same stamp designs with 5 mm marking points, giving users another option for pumpkins with more pronounced curves or grooves. The original 2 mm-point versions remain available—choose whichever works best for your pumpkin. Gently rock the stamp as needed to mark the outline. Longer points provide extra reach, but may still need to be pressed in sections on uneven surfaces. TIP: Painter’s Tape Makes the Dots Easier to See! Apply a layer of painter’s tape over the area you want to carve, then press the stamp through the tape. The punctures stand out against the tape, making the dotted outline much easier to follow—especially on rough or patterned pumpkin skin. Smooth the tape against the pumpkin before stamping, follow the dots to carve, and peel away the tape when finished. Save Your Pals for Next Season Use battery-powered LED lighting only—no candles or open flames near the printed parts. The stencils mark the carving path; they do not cut through the pumpkin. Adult supervision is recommended when handling pointed stamps and nails, and carving should be done by an adult. Remove the printed pieces before disposing of your pumpkin, gently clean and dry them, and save them for next Halloween! Share your finished pumpkins in the makes—I’d love to see your Pumpkin Pals brought to life! Personal use only. Please contact me for commercial licensing. 🎃 Enjoying your Pumpkin Pals? A like or Boost helps more makers discover my designs and supports me in creating more! Follow my profile for new releases, and check out my other Pumpkin Pals inserts and carving stamps for more ways to customize your pumpkin. I’d love to see what you create—share a photo of your finished pumpkin in the makes!
Tags
Diseñador
TL Prints 3D