
Robotic Arm CyberBrick
Peso
115g
Tiempo
5h 29m
Precio
Cotiza este producto por WhatsApp
Contáctanos y te damos el precio según color y acabado
Las dimensiones dependen del diseño. Confirmamos las medidas exactas por WhatsApp.
Descripción
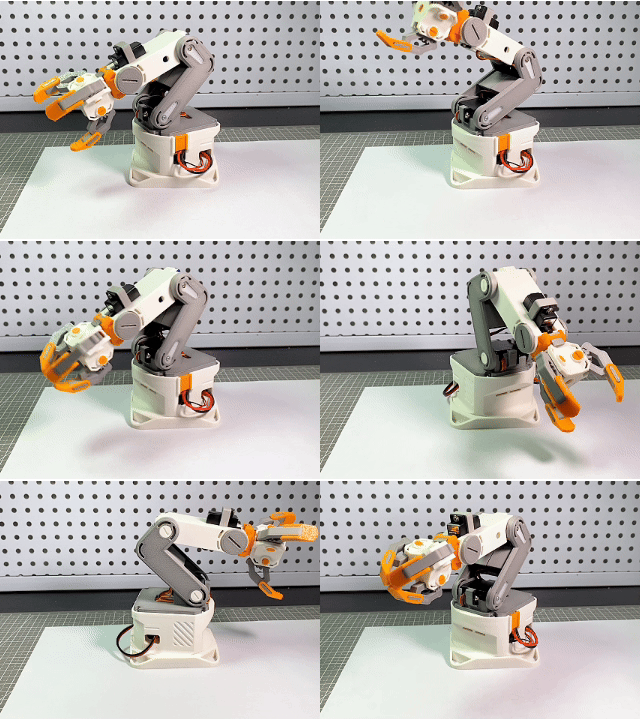
Boost MeIf you like this design project, feel free to give me a free boost. It will bring me more encouragement and support for my creations![Model Introduction] This is a turbine-driven three-jaw three-axis robotic arm built with CyberBrick. It is compatible with the official CyberBrick remote control configuration. The hardware is highly integrated and compact in size, and it features a 360° high-degree-of-freedom range of motion. If you like this robotic arm, you are welcome to replicate it. For your better assembly, usage experience and operational safety, please take some time to read the following instructions carefully. [Design Features] 1. Industrial design in the cyberpunk style, fully integrated internal hardware, compatible with CyberBrick modules, no additional electronic hardware or parts required. 2. Turbine-driven three-jaw manipulator with self-locking function, which can grasp objects with irregular surfaces better and more stably. 3. An external power switch and charging port allow convenient one-touch power switching and plugging/unplugging to charge the built-in lithium battery. *Note: During charging, turn on the power switch to effectively charge the lithium battery. 4. Quickly removable Cyberbrick core module 5. The mechanical head adopts a detachable modular design, and more module functions can be updated later. 6. The advantages of CyberBrick+ code-driven mode: you can upload .json configuration files just like in a regular CyberBrick project, and you can also execute code with richer programming logic than the official CyberBrick UI operation interface. I have also uploaded the annotated version of my code in the attachment. Referring to the official introduction of the CyberBrick library, you can modify any parameters based on my code, and even redesign the execution logic of the robotic arm! Official CyberBrick custom library link: https://makerworld.com/en/cyberbrick/api-doc/cyberbrick_core/lib/index.html The modified code only needs to be copied and pasted into the code editor box, saved and submitted, then re-uploaded to the device. *Note: If the modified code does not respond during execution, it is recommended to restore the main controller of the receiving end to factory settings, press the RST key, and re-upload the configuration to the device to resolve the issue. [Bill of Materials] Below is the bill of materials required in addition to the 3D printed parts. All materials are available at the official Maker Store. You can also add the list I prepared on the right to your shopping cart with one click. Remote Control Receiver Assembly * 1 030 Micro DC Motor with SH1.0 * 1 360° 9g Servo Motor with Clutch Protection * 1 180° 9g Servo Motor with Clutch Protection * 2 1:48 Single-aXis Plastic Reduction Gear Kit *1 Lubricant Oil *1 Power Switch Module with 2 Pin XH2.54 Connector 14500 7.4V800mAh Li-ion Battery * 1 7.4V Lithium Battery Charger with XH2.54 Connetor *1 M2.5 x 6 BHCS machine screw *8 100 mm Wire with2Pin XH2.54 Connectors *1 [Installation Instructions] The angle of the 180° servo needs to be calibrated before use. Please refer to the attached file CyberBrick_Robotic_Arm_Assembly_Process.pdf I uploaded for the detailed assembly procedure. [Operation method] A CyberBrick controller needs to be prepared separately before use. Below are the operating instructions for the official remote controller. This is the remote controller for the compact CyberBrick I designed in the same style. It has a smaller size than the official controller. If you like this matching controller, click the picture to go directly to the model's homepage. [Notes] Certain operating specifications are required before use The following cases are examples where inappropriate operations should be avoided: When the 360-degree servo gripper reaches its maximum angle, it should stop continuous rotation toward the limit position to prevent the motor from being damaged by the limit block. If the worm does not rotate during operation, rotate it slightly in the reverse direction and then push it forward. When elbow 1 reaches 90 degrees, the upper elbow should be raised to provide more movement space for the elbow. 3. Avoid bending the robotic arm while the power is on. You may bend the robotic arm for storage after powering it off, but take care not to yank the servo violently. Alternatively, you can use the long-press one-key automatic reset function while powered on, and then shut down the device. 4. The mechanical gripper is driven by a worm and worm gear and cannot be moved manually. Please operate the mechanical gripper when power is supplied. 5. If you noticeably feel that the motor lacks power or stops rotating, check whether the battery is drained and charge the lithium battery in a timely manner. Battery Precautions 1. Please use the officially recommended USB charging adapter. 2. Do not leave unattended during charging. 3. If the battery is found damaged, please stop using it immediately. 4. Turn on the power switch during charging to effectively charge the lithium battery. [Finally] If you like this design, feel free to give it a like, save it or print it directly. You can also give me a free boost so more people can see it. If you want to check out my other designs, visit my profile to browse more previous works. A simple follow means a great deal to me; it is the greatest support and encouragement you can offer, and I will keep bringing more design works in the future. Boost MeIf you like this design project, feel free to give me a free boost. It will bring me more encouragement and support for my creations!
Tags
Diseñador
tipflow