
SenseCraft Tulip 80 — Espresso Cup Mold
Peso
52g
Tiempo
2h 15m
Precio
Cotiza este producto por WhatsApp
Contáctanos y te damos el precio según color y acabado
Las dimensiones dependen del diseño. Confirmamos las medidas exactas por WhatsApp.
Descripción
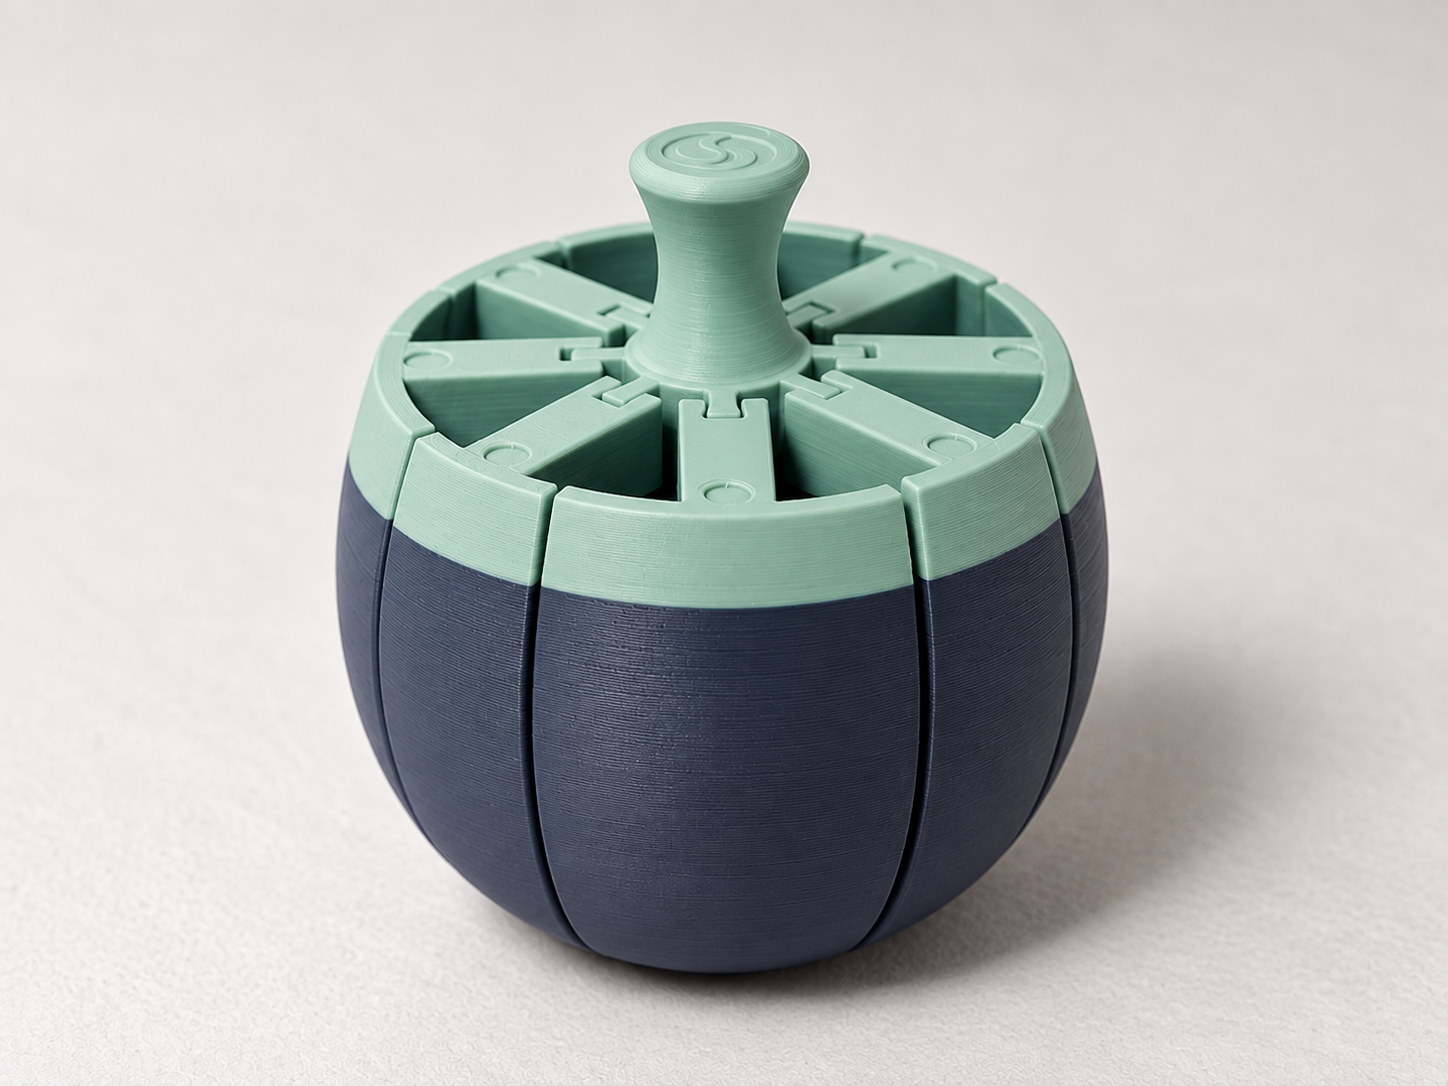
SenseCraft Tulip 80 — Espresso Cup Mold for Pottery | Segmented Collapsible System | Barista Line The SenseCraft Tulip 80 is a reusable 3D-printed forming mold for slab-built pottery, developed specifically for espresso cups and built around a segmented collapsible core. The mold uses eight forming segments held together by a removable central pull-lock. Once the clay has firmed sufficiently, the pull-lock is removed and the segments can move inward, allowing them to pass through an opening smaller than the widest part of the cup. This makes it possible to create a true tulip-shaped espresso cup with a body wider than its rim without trapping the forming tool inside the clay. The Tulip 80 is part of the SenseCraft Barista Line, a series developed around coffee-specific ceramic forms. Its dimensions were designed as a coordinated system rather than as isolated measurements. Capacity, rim diameter, maximum body diameter, height and the position of the widest section were developed together to create a compact espresso cup with a controlled tulip profile. The geometry is also informed by published research on the relationship between cup shape and coffee perception, particularly the influence of vessel geometry on perceived aroma. The final Tulip 80 proportions were then developed specifically for this project around espresso use, ergonomics and ceramic manufacturing. SEGMENTED COLLAPSIBLE SYSTEM The main mechanical feature of the Tulip 80 is its segmented collapsible core. Each complete mold consists of: 8 individual forming segments 1 removable central pull-lock With the pull-lock fully inserted, the segments are held outward in their working position, forming the complete Tulip 80 profile. After the clay has firmed sufficiently, the pull-lock is pulled straight upward. The narrow key segments can then move toward the center, creating the clearance required to remove the remaining segments through the smaller rim opening. ASSEMBLE → FORM → PULL → COLLAPSE → REMOVE The system allows the creation of ceramic forms whose maximum body diameter is larger than the opening — geometry that would trap a conventional rigid one-piece forming tool. The principle is similar to a segmented collapsible mandrel, adapted for pottery forming and FDM printing. TULIP 80 PROFILE The Tulip 80 profile was designed specifically around espresso. Target fired geometry: Nominal capacity: 80 mL Internal rim diameter: 48 mm Maximum internal diameter: 54 mm Internal height: 41 mm Height of maximum diameter: 24 mm Flat internal floor: Ø24 mm The maximum body diameter is approximately 12.5% larger than the rim diameter, creating a moderate tulip closure while maintaining practical access to the drink. The internal profile is defined using two tangent elliptical arcs and a flat central floor. This creates: a rounded lower body a controlled maximum diameter a smooth upper taper a moderately narrowed rim a continuous internal forming surface The calculated reference cavity is approximately 79.7 mL. The mold creates the internal profile of the ceramic cup. The ceramic handle is added separately and is not formed by this mold. RESEARCH-INFORMED DESIGN The Tulip 80 was developed from defined geometric and functional criteria. Published research has shown that cup shape can influence the sensory perception of coffee, including perceived aroma intensity. That research informed the decision to explore a moderately closed tulip geometry. The exact dimensions of the Tulip 80 were then developed specifically for this project, balancing: espresso capacity aroma-focused geometry comfortable drinking access practical rim diameter internal spoon access ceramic forming requirements demolding requirements FDM manufacturability The Tulip 80 should therefore be understood as a research-informed, technically defined espresso cup geometry, rather than a claim that one vessel shape is universally optimal for every coffee or preparation. MOLD RELEASE Before applying clay, lightly dust the exterior forming surface with cornstarch. Cornstarch acts as a dry release agent and helps prevent soft clay from sticking to the 3D-printed surface. Use only a thin, even layer. A soft brush or small powder pouch works well. Other dry release powders used in pottery, such as fine kaolin, may also work, but cornstarch is the recommended starting point for this mold. Avoid applying a heavy coating, as excess powder may affect surface detail. HOW TO USE 1. Assemble the mold Arrange the eight forming segments into the complete Tulip 80 shape. Insert the central pull-lock from the top until fully seated. Check that: all seams are aligned the exterior forming surface is continuous the mold feels stable the pull-lock moves smoothly the segments are fully seated in their working position 2. Apply release agent Lightly dust the exterior forming surface with cornstarch. Use only enough to create a thin release layer. 3. Prepare the clay Roll an even clay slab. The reference Tulip 80 process uses approximately: 5 mm wet clay for the walls 5.5 mm wet clay for the bottom These values are starting references and may be adjusted according to clay body, forming technique and desired finished wall thickness. Very soft or sticky clay may benefit from resting briefly before forming. 4. Form the cup Wrap the clay around the outside of the assembled mold. Join the slab seam using your preferred pottery technique. Gently compress and smooth the clay against the forming surface, paying particular attention to: the flat lower section the rounded lower transition the widest part of the body the upper taper the rim Form and attach the bottom using your normal slab-building method. Trim and refine the top and bottom as required. 5. Allow the clay to firm Do not remove the mold while the clay is extremely soft. Wait until the clay can support its own shape while still retaining enough flexibility for safe demolding. The correct timing depends on: clay body slab thickness humidity room temperature forming pressure studio conditions Do not allow the clay to shrink tightly around the mold before removal. 6. Release the pull-lock Hold the mold securely and pull the central handle straight upward. Do not twist the handle during removal. Removing the pull-lock releases the segmented core. 7. Collapse and remove Move one of the narrow key segments gently toward the center. Once the first key segment moves inward, additional clearance becomes available. Continue removing the key segments, then remove the larger forming segments individually through the cup opening. Do not force the printed parts against the clay wall. The mold should collapse internally rather than forcing the ceramic opening outward. 8. Finish the cup After removing the mold: refine the drinking rim smooth segment seams if necessary finish the base attach a ceramic handle decorate as desired dry bisque fire glaze complete the final firing using your normal ceramic process DIMENSIONS The Tulip 80 is designed around a target fired internal geometry of: 80 mL nominal capacity 48 mm rim diameter 54 mm maximum diameter 41 mm internal height Ø24 mm flat internal floor The downloadable mold is enlarged to compensate for ceramic shrinkage. With the reference 12% linear shrinkage, the approximate forming geometry is: 46.59 mm forming height Ø54.55 mm forming rim Ø61.36 mm maximum forming diameter Ø27.27 mm flat forming floor Final ceramic dimensions and capacity depend on the actual behavior of the clay body and firing cycle. CLAY SHRINKAGE The Tulip 80 reference model is designed around approximately 12% total linear shrinkage from the formed wet state to the final fired state. The finished ceramic piece becomes smaller during drying and firing. Actual shrinkage varies significantly between: clay bodies manufacturers firing temperatures firing schedules forming methods Always verify the shrinkage specification for the clay body being used. For the best dimensional accuracy, make a fired test piece and compare the measured result with the target geometry. Glaze thickness, compression and finishing can also slightly affect the final dimensions. DO NOT SCALE THE MODEL The Tulip 80 is a complete matched mechanical system. Manual scaling is not recommended. Scaling the model changes not only the cup geometry, but also: dovetail dimensions sliding clearances pull-lock fit segment gaps mechanical tolerances This may prevent the collapsible mechanism from operating correctly. Use the Tulip 80 parts only as the complete matched set supplied with the model. CARE Clean with a damp cloth. Remove clay residue from the sliding mechanism after use. Keep clay particles out of dovetails and sliding surfaces. Allow all parts to dry before storage. Avoid prolonged soaking. Avoid very hot water when using PLA. Inspect the pull-lock and segment interfaces periodically. Remove dried clay before reassembling the mold. IMPORTANT The SenseCraft Tulip 80 is a pottery forming mold, not a slip-casting mold. Clay is applied around the outside of the assembled tool. The mold determines the internal profile of the ceramic espresso cup. The segmented collapsible system is specifically designed to solve the demolding problem created by the Tulip geometry, where the maximum body diameter is larger than the rim opening. The printed parts are removed before the ceramic piece is dried, fired and glazed. The Tulip 80 is part of the SenseCraft Barista Line, developed around purpose-designed ceramic forms for coffee preparation and service. Boost MeIf this model is useful, please consider giving it a Boost.
Tags
Diseñador
SenseCraft