
DeskRail. Make your desk smarter.
Peso
777g
Tiempo
25h 3m
Precio
Cotiza este producto por WhatsApp
Contáctanos y te damos el precio según color y acabado
Las dimensiones dependen del diseño. Confirmamos las medidas exactas por WhatsApp.
Descripción
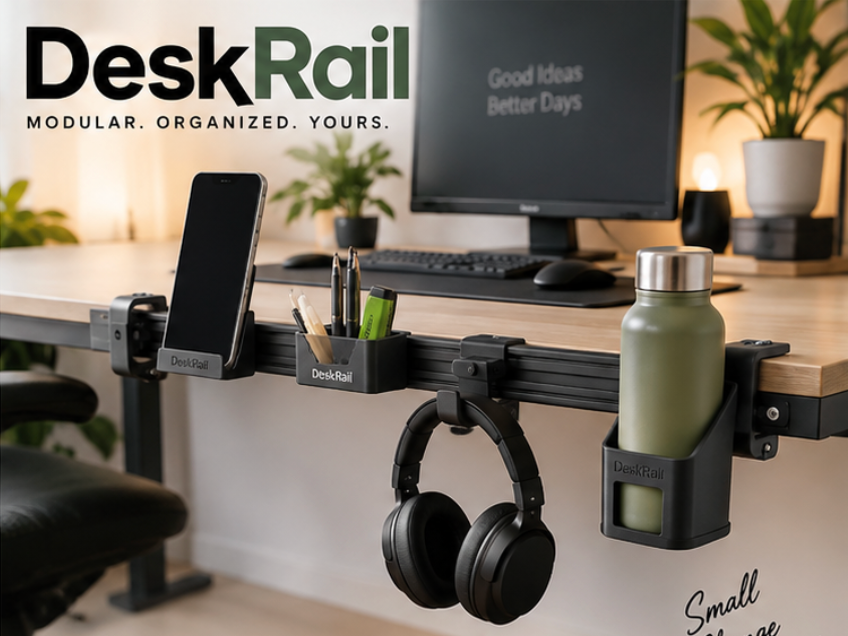
⚠️ IMPORTANT — PLEASE READ BEFORE PRINTING DeskRail is a modular desk organization system designed to turn the unused edge of your desk into useful space. Before you start printing, there are two things you absolutely need to check: 1. Measure the thickness of your desk. 2. Select only the clamp size that matches your desk. Do not print all clamp sizes. DeskRail includes clamp versions from 20 mm to 30 mm in 1 mm steps. Measure your desk thickness where you want to install DeskRail, then choose the matching clamp size. For example: 22 mm desk → print the 22 mm clamps 25 mm desk → print the 25 mm clamps 28 mm desk → print the 28 mm clamps Each clamp size is included twice, because the standard rail is designed to be mounted with two matching clamps. ⚠️ Deselect all clamp sizes you do NOT need before slicing! The clamps are required to mount DeskRail, but you only need the correct size for your desk. DeskRail Modular. Clean. Yours. I wanted DeskRail to be more than just another phone holder, headphone hook or cable clip. The idea was simple: Why place even more things on the desk when the edge of the desk is almost completely unused? DeskRail turns that edge into a modular mounting system. One rail. Multiple accessories. Different setups. No permanent installation. More space. Less mess. You can build a minimal setup with only one accessory or create a full workstation with your phone, headphones, controller, cables, pens and more. And because everything uses the same rail system, you can rearrange the setup whenever you want. 🖥️ How the system works DeskRail consists of three main parts: The Rail This is the main horizontal mounting rail. The Clamps These attach the rail to your desk. The Accessories These slide onto the rail and can be positioned wherever you want them. The rail itself stays the same. The accessories simply slide onto it. That means you can change your setup without replacing the entire system. One Rail. Endless Setup. 📏 STEP 1 — Measure your desk Before printing the clamps, measure the thickness of your desk. Measure from the top surface to the bottom surface of the desk plate at the exact location where you want to install DeskRail. Clamp sizes included: 20 mm 21 mm 22 mm 23 mm 24 mm 25 mm 26 mm 27 mm 28 mm 29 mm 30 mm The clamps use a slightly tapered internal geometry so they can create pressure when pushed onto the desk edge. You should choose the clamp that matches the real thickness of your desk as closely as possible. Example If your desk measures approximately 24 mm, select: 2× DeskRail Clamp 24 mm and deselect all other clamp sizes. Do not simply print every clamp. 🧩 STEP 2 — Choose your accessory tolerance DeskRail accessories are available in three tolerance versions: 0.24 mm — Tight Fit Best if your printer is very dimensionally accurate and you want the accessories to sit as firmly as possible. Advantages: very little movement tight connection minimal wobble It may require slightly more force to slide accessories onto the rail. 0.25 mm — Balanced Fit This is the standard version and the one I recommend trying first. It offers a good balance between: easy installation secure fit low movement easy removal For most printers, this should be the best starting point. Balanced. Simple. Reliable. 0.28 mm — Easy Fit This version has slightly more clearance. It is useful if: your printer tends to print dimensions slightly larger 0.24 or 0.25 feels too tight you want accessories to slide on and off more easily There may be slightly more movement compared with the tighter versions. 🧪 Not sure which tolerance to use? Print the Fit Test Plate first. This plate is intentionally small and uses very little filament. It allows you to test the rail connection before printing all of the accessories. The Fit Test includes test pieces for: 0.24 mm 0.25 mm 0.28 mm Try each one on the small rail test piece. The ideal tolerance should: slide onto the rail by hand not require excessive force not wobble noticeably still be removable If 0.25 works perfectly, use the 0.25 accessory plate. If it feels too tight, try 0.28. If you want an even tighter connection and your printer is very accurate, try 0.24. Test small. Print smart. 🖨️ Plate Guide The project is organized into several plates so you can easily print only what you need. Plate 1 — Standard Setup Contains the main standard rail and the parts needed for the basic DeskRail setup. This is the starting point for most users. If you only want the normal DeskRail length, this is the rail you should use. Plate 2 — Fit Test Highly recommended before printing all accessories. This plate contains the small tolerance test pieces. Use it to compare: 0.24 / 0.25 / 0.28 before deciding which accessory plate to print. There is no reason to print three complete accessory sets just to find out which tolerance fits your printer best. That is exactly what this plate is for. Plate 3 — Accessories / 0.25 This is the standard accessory set using the 0.25 mm tolerance. It contains the main DeskRail accessories, including things such as: phone holder headphone holder controller holder cable holder pen holder universal mounting plate You do not have to print every accessory. Select only the ones you actually want. Your Desk. Your Setup. Plate 4 — Clamp Sizes 20–25 mm Contains: 20 mm clamps 21 mm clamps 22 mm clamps 23 mm clamps 24 mm clamps 25 mm clamps Each size is included twice. Important: Only keep the two clamps matching your desk thickness. Deselect the rest before slicing. Plate 5 — Clamp Sizes 26–30 mm Contains: 26 mm clamps 27 mm clamps 28 mm clamps 29 mm clamps 30 mm clamps Again, each size is included twice. Only print the correct pair. Plate 6 — Extended Rail This plate is OPTIONAL. The normal DeskRail works without it. The Extended Rail is designed for users who want: more accessories a wider setup more usable rail space It contains the additional rail section and the connector required to extend the system. You only need this plate if the standard rail is not long enough for your setup. Start small. Expand whenever you want. That is one of the main ideas behind DeskRail. Plate 7 — Accessories 0.24 Contains the same main accessories as the standard accessory plate, but with a tighter 0.24 mm rail tolerance. Use this plate if your Fit Test shows that 0.24 works best. Plate 8 — Accessories 0.28 Contains the same accessories with a slightly looser 0.28 mm tolerance. Use this version if the standard version feels too tight. ✅ What should I actually print? For a normal DeskRail setup, you will usually need: 1× standard rail 2× clamps matching your desk thickness and the accessories you want That is all. You do not need: every clamp size all three accessory tolerance versions the Extended Rail unless you want a longer system For example, somebody with a 24 mm desk who prefers the standard tolerance could print: Standard Rail 2× 24 mm Clamp 0.25 Phone Holder 0.25 Cable Holder 0.25 Headphone Holder Done. 🔧 Modular by design DeskRail was designed as a system rather than one single model. You can start with: Rail + Phone Holder and later add: Headphones then: Cable Management then: Controller Holder and eventually extend the rail itself. Nothing forces you into one specific setup. Move things around. Remove things. Add things. DeskRail grows with your desk. 🎮 Included accessory possibilities Depending on the plate/version, DeskRail includes several useful modules such as: Phone Stand Keep your phone visible without using valuable desk space. Headphone Hook Store headphones below the desk instead of leaving them on top. Controller Holder A dedicated place for your game controller. Cable Holder Keep frequently used cables within reach instead of letting them disappear behind the desk. Pen Cup Move pens and small tools away from the work surface. Universal Plate A simple base for future DeskRail accessories and custom ideas. 🧱 Material recommendation For normal accessories and rails, common materials such as: PLA / PLA+ / PETG should work well. For the clamps, PETG is recommended, especially if you want a little more toughness and durability around the desk mounting area. 🛠️ Before printing the full setup For the best result: 1. Measure your desk 2. Select the correct clamp size 3. Deselect every other clamp 4. Print the Fit Test 5. Choose 0.24 / 0.25 / 0.28 6. Select only the accessories you want 7. Print the Extended Rail only if you actually need more space This saves filament, print time and unnecessary test prints. ⚠️ One more important note Different printers, materials and calibration settings can produce slightly different dimensions. That is why DeskRail includes multiple tolerance options instead of pretending that one clearance will be perfect for every printer. The Fit Test exists for a reason. It takes very little time to print and can save you from printing an entire accessory set with the wrong fit. Measure once. Test once. Build it right. ♾️ Built to expand DeskRail is intentionally modular. The Universal Plate and standardized rail connection make it possible to develop even more accessories in the future. A desk setup is never really finished. And DeskRail doesn't have to be either. One system. Many possibilities. More space. Less mess. Modular. Clean. Yours. Welcome to DeskRail. Boost Me
Tags
Diseñador
Oliver