
RX-78-2 Full Wearable Cosplay Suit of Armor, Robot
Peso
188g
Tiempo
16h 13m
Precio
Cotiza este producto por WhatsApp
Contáctanos y te damos el precio según color y acabado
Las dimensiones dependen del diseño. Confirmamos las medidas exactas por WhatsApp.
Descripción
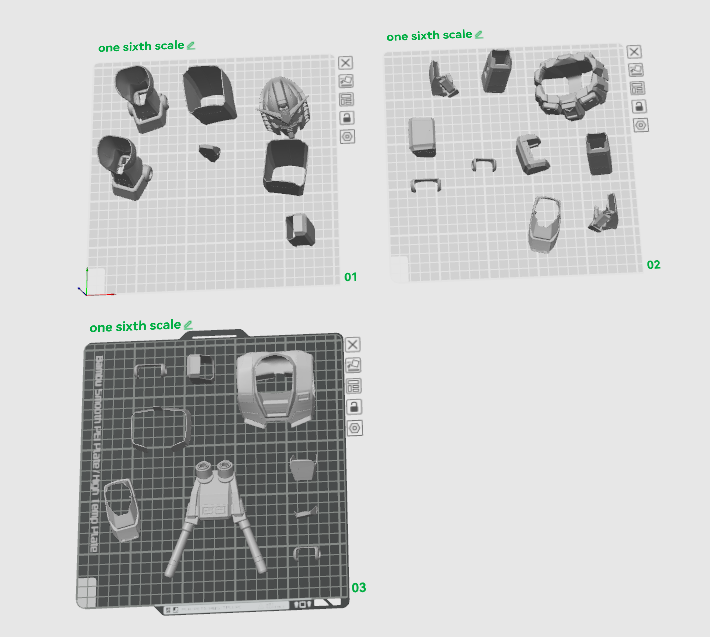
RX-78-2 Full Suit Detailed Description & Functional Overview Step into the cockpit and transform yourself into the Earth Federation's iconic Mobile Suit with this full-scale, fully wearable RX-78-2 Full Suit armor kit! Meticulously engineered for peak proportion, comfort, and structural rigidity, this complete armor set covers the head, torso, shoulders, arms, waist, legs, and feet. How It's Used: This is a full-scale wearable cosplay suit. Individual armor plates are split, keyed, and optimized for standard 3D printer beds. Assembly requires fusing smaller segments using hot metal staples from an ATOLS Plastic Welding Kit for structural strength, and securing details with ARKA KRAFTPROTZ UNIVERSAL Superglue. Filament Recommendations: For a suit of this magnitude that needs to withstand convention floors, we recommend printing the structural and outer shell pieces using durable SUNLU Standard PETG or high-impact SUNLU ASA for superior UV resistance and thermal stability. For the vibrant color accents, SUNLU PLA Meta or SUNLU Silk PLA offer stunning surface finishes right off the bed. Need help sizing this for your dimensions? Make sure to use these Cosplay Calipers to measure off your body accurately. For a complete visual guide on scaling, slicing, and putting it all together, check out this video: How to 3D Print Cosplay Armor: Download, Scale, Slice, Print & Assemble | Complete Guide. If you are printing this as a multi-color setup or need help coloring, watch this guide on How to remesh and color prints effectively in Bambu Studio and/or Snapmaker U1. And if you don't know what a plastic welder is, or how to use one, watch this quick Instagram video of me using it in real time. You can pick up the exact tool used here: ATOLS Plastic Welding Machine Hot Stapler. History & Origins Originating from the legendary 1979 anime series Mobile Suit Gundam, the RX-78-2 designed by Kunio Okawara revolutionized mecha design, shifting it from simple super robots to realistic, mass-produced military machinery ("Mobile Suits"). This 3D printable iteration brings Amuro Ray's legendary machine out of the Universal Century and into the physical realm for cosplayers and mecha builders worldwide. Alternative Uses, Remix Ideas, & Keywords Because these modular armor segments are heavily articulated and geometrically versatile, they can be adapted far beyond standard mecha cosplay. Here are over 15 alternative use and remix concepts: Cyberpunk Biker Body Armor: Remix the chest plates and shoulder guards with neon LED channels for a futuristic motorcycle riding suit. Sci-Fi Airsoft / Paintball Rig: Scale down the torso and shoulder modules to create high-protection tactical tactical sports gear. Halloween Mecha Statues: Assemble and mount the full suit on a PVC skeleton frame to create an impressive life-sized entryway display or store statue. Robot Convention Greeter Greeter Bot: Integrate servo motors into the head and backpack thrusters for an animatronic display piece. Post-Apocalyptic Power Armor: Distress the surface texture, add simulated rust using textured filaments, and repurpose it as wasteland scavenger gear. Space Marine Style Heavy Trooper: (generic sci-fi trope) Modify the shoulder pauldrons and boots for bulky galactic marine infantry costumes. Mecha Motorcycle Helmet: Hollow out and adapt the head crest and mask geometry into a custom street-legal motorcycle helmet shell. Wall-Mounted Giant Busts: Print only the upper torso and head at 200 scale as an epic wall-hanging trophy mount for a gaming room. DJ Booth Facade Panels: Use individual armor chest vents and shoulder segments as geometric, backlit facade tiles for electronic music stages. Themed PC Case Enclosure: Remix the chest intake vents and cockpit hatch shapes into a custom desktop computer chassis shell. Action Figure Master Sculpt: Scale down individual CAD files to print high-detail master statues for resin casting. Theatrical Stage Props: Utilize lightweight infills to build safe, high-visibility stage armor for theatrical sci-fi productions. Store Display Mannequin Outfits: Dress retail display dummies in custom mecha gear to draw attention in hobby and comic shops. Drone Chassis Shells: Adapt the lightweight shoulder and backpack geometries into custom aerodynamic housings for large industrial FPV drones. Futuristic Dog Costume Armor: Scale down select forearm and shin guards for an epic cyber-pup canine companion cosplay (always ensure absolute comfort and freedom of movement for pets!). Cosplay Armory Wall Art: Mount individual segments (like the shield or shoulder bells) on a workshop tool wall as structural decorative art. Keywords & Tags: RX-78-2, Gundam, Mobile Suit, Mecha, Cosplay Armor, Wearable Suit, Sci-Fi, Robot Costume, 3D Print Armor, Cosplay Prop, Mecha Suit, Universal Century, Giant Robot. And if you've come this far, maybe you're willing to come a little further... - Andy Dufresne #TeachAManToFish If you are BRAND NEW to 3D printing, click here: https://youtu.be/7zYCPrTGIaY If you want to learn 11 Slicer Tricks I Wish I Knew Sooner: https://youtu.be/nDSTR_NQC_0 If you want to learn to do what I do (and stay out of my inbox so you can make your own changes to this file), click this link: https://youtu.be/iFfUVc33sTk You are always welcome to reach out and ask me questions, but know, that AI is INFINITLY smarter than me, so consult any reputable AI model first before asking me!!! #EmpowerYou : ) YouTube How to 3D Print Cosplay Armor: Download, Scale, Slice, Print & Assemble | Complete Guide Open in YouTube How to 3D Print Cosplay Armor: Download, Scale, Slice, Print & Assemble | Complete Guide Stephen Thorwart Opens in a new window Want to 3D print a full set of cosplay armor but aren't sure how to get from downloaded files to something you can actually wear? In this complete start-to-finish tutorial, I walk through my entire process for downloading, scaling, preparing, slicing, printing, and assembling the armor files available on my Timberlake Creations MakerWorld profile. 🔗 DOWNLOAD MY 3D PRINTABLE DESIGNS: Timberlake Creations on MakerWorld. Go to this link: https://makerworld.com/en/@TIMBERLAKEBiz And near the center of the screen, click "3D Models" to see all my work!!! This video is designed to answer many of the questions I get about my armor files: • Where are the files and how do I download them? • Which files do I actually need? • Are all of the armor parts included? • What size are the original models? • What scale should I print the armor at? • How do I scale armor specifically to MY body? • How can I make a large armor piece fit on my printer's build plate? • How should armor pieces be oriented? • When should I use supports? • How do I reduce the chances of a failed print? • How do I assemble the finished pieces? I also show some of the tools and software I use throughout the process, including: 🔹 Bambu Studio – scaling, orientation, slicing, supports, build-plate setup and preparing files for printing 🔹 Blender – working with and modifying 3D models 🔹 Meshmixer – manipulating, cutting and preparing STL files 🔹 Autodesk Fusion 360 – CAD work and more precise modifications 🔹 Cosplay Calipers – taking measurements and transferring those measurements to your digital armor 🔹 3D Print Welding Kit – joining printed armor pieces together I also cover several simple things that can dramatically improve your chances of getting a successful armor print: ✓ Find the flattest possible printing surface ✓ Use Bambu Studio's Orient / Lay on Face tools ✓ Use glue or other build-plate adhesion methods when appropriate ✓ Slow the print down when the geometry requires it ✓ Add supports where they're actually needed ✓ Check your model carefully after slicing ✓ Use the right-click tools in Bambu Studio to manipulate and prepare individual parts ✓ Don't blindly hit PRINT just because the slicer lets you! One of the biggest mistakes with cosplay armor is assuming that downloading the STL is the hard part. It isn't. Scaling, orientation, slicing and print preparation can make the difference between a clean wearable armor piece and 14 hours of extremely expensive spaghetti. This video takes you through the workflow I actually use so you can understand not just WHAT buttons to press, but WHY you're pressing them. Whether you're printing a helmet, chest armor, gauntlets, shoulder armor, leg armor or an entire cosplay suit, the same basic workflow applies. If you're using a Bambu Lab printer such as the X1 Carbon, P1S, P1P, A1, A1 Mini, H2D or another FDM printer, most of these techniques will translate directly to your setup. If one of my MakerWorld armor designs brought you here, I'd love to see your finished build. Post your make, leave a rating, and tag Timberlake Creations so I can check it out. 👍 LIKE if this helped you avoid a failed armor print. 🔔 SUBSCRIBE for more 3D printing, cosplay armor, Bambu Studio and design tutorials. 💬 QUESTIONS? Drop them in the comments — they may become the next tutorial. #3DPrinting #CosplayArmor #BambuLab #BambuStudio #Cosplay #3DPrintedArmor #MakerWorld #STLFiles #ArmorPrinting #3DPrintingTutorial #Blender #Meshmixer #Fusion360 #TimberlakeCreations Opens in a new window How to examine and change the mesh, and color models in Bambu Studios, Snapmaker Orca or Cura Stephen Thorwart Opens in a new window Learn how to examine, edit and COLOR 3D models using the painting and mesh tools in Bambu Studio and OrcaSlicer. In this tutorial, I walk through the basic tools I use to inspect a model, work with individual meshes and add colors to different areas of a 3D print before slicing. You'll learn how to: • Examine the mesh of a 3D model • Identify different parts and surfaces of a model • Work with individual model components • Use Bambu Studio's coloring and painting tools • Change colors on specific areas of a model • Prepare models for multicolor 3D printing • Assign filament colors before slicing • Work with models containing multiple colors • Use similar tools in Bambu Studio and OrcaSlicer • Prepare your finished model for printing These techniques are especially useful for signs, logos, decorative prints, cosplay pieces, props and other models where you want specific areas printed in different colors. Whether you're using an AMS or simply trying to understand how colors and meshes work inside your slicer, this tutorial covers the basic workflow for preparing multicolor 3D prints. 🛠️ SOFTWARE: Bambu Studio OrcaSlicer 🖨️ GREAT FOR: Multicolor 3D printing AMS printing Signs & logos Cosplay Props Custom STL files Subscribe for more Bambu Studio, OrcaSlicer, STL editing, 3D modeling and 3D printing tutorials. #BambuStudio #3DPrinting #OrcaSlicer Opens in a new window
Tags
Diseñador
Timberlake Creations - Business