
HackMan3D Control Deck-Build Your Own Controller
Peso
88g
Tiempo
2h 49m
Precio
Cotiza este producto por WhatsApp
Contáctanos y te damos el precio según color y acabado
Las dimensiones dependen del diseño. Confirmamos las medidas exactas por WhatsApp.
Descripción
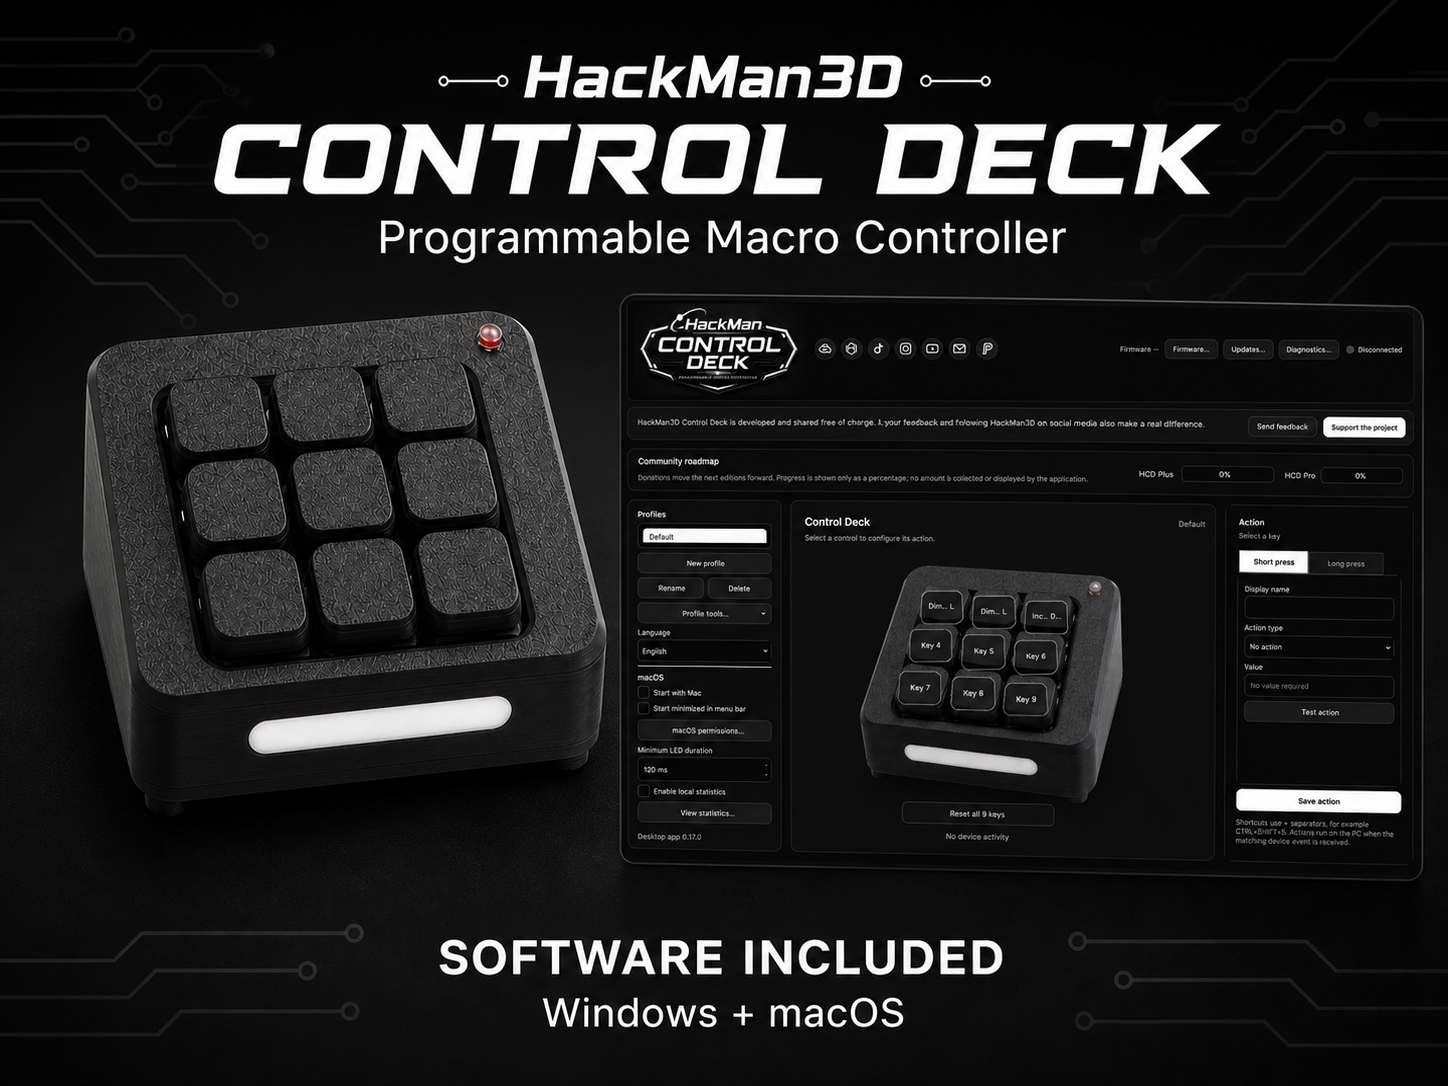
HackMan3D Control Deck — Build Your Own Programmable Macro Controller I am proud to introduce the HackMan3D Control Deck, or HCD: a fully customizable macro controller designed for 3D printing and compatible with both Windows and macOS. The HCD was created to be affordable, practical and accessible. You do not need programming experience or Arduino IDE: the official firmware and flashing tools are built directly into the HackMan3D Control Deck desktop application. https://github.com/HackMan3D/Hackman3D-Control-Deck Main features 9 mechanical MX switches arranged in a 3×3 grid Separate short-press and long-press actions Up to 18 programmable functions Red computer-connection indicator White front light activated when a key is pressed Independent brightness adjustment for both lights USB connection Windows and macOS support Multiple customizable profiles Profile import, export, duplication and backup Automatic device detection Integrated firmware installation and updates Background operation No Arduino IDE required What can the HCD control? Each physical key can execute one action with a short press and a different action with a long press. Available actions include: Copy, paste and cutUndo and redo Launch an application Open a file or folder Open a website Type predefined text Execute a custom keyboard shortcut Increase or decrease speaker volume Mute the speakers Mute the microphone Control media playback Increase or decrease screen brightness Lock the computer Put the computer to sleep Restart the computer Shut down the computer The available shortcuts and system commands automatically adapt to Windows or macOS. Profiles The application supports multiple profiles for different workflows, such as: 3D printingCAD and 3D modeling Video editing Streaming Office work Gaming Internet browsing Music and media control Profiles can be created, renamed, duplicated and deleted. They can also be imported or exported to: Create backupsShare a configuration Transfer settings to another computer Create variants for different applications Profiles are stored separately for each connected HCD model. Custom keycaps The downloadable project files include 52 ready-to-print custom keycaps, featuring a selection of letters, numbers, symbols, application icons and commonly used shortcuts. A blank, logo-free keycap is also included in editable STEP format. This allows every maker to create their own personalized keycaps while preserving the correct dimensions and Cherry MX-compatible mounting system. You can use the STEP file to: Add text, letters or numbersAdd symbols for common shortcuts Add your own logo Create application icons Engrave a design into the keycap Create raised details Adapt the model in your preferred CAD software Export your customized version for 3D printing You are encouraged to share your own keycap creations here so that other members of the community can download, print and use them. This makes it possible to create a completely personalized set of keys for your own workflow. For printing with a 0.4 mm nozzle, make sure engraved or raised details are large and thick enough to remain clearly visible after slicing. Required electronic components To build one HCD, you will need: 1 × Arduino Pro Micro USB-CATmega32U4, 5 V / 16 MHz version 9 × affordable Cherry MX-compatible mechanical switches 9 × MX-compatible keycaps 2 × IRLB8721 N-channel MOSFETs 1 × 5 mm red LED Approximately 5 cm of white 5 V COB LED strip 4 × 100 Ω resistors Thin electrical wire Heat-shrink tubing 1 × USB-C data cable Make sure the USB-C cable supports data transfer. A charging-only cable may power the controller but will not allow firmware installation or communication with the application. Required screws 4 × M2×10 screws for the feet 3 × M2×10 screws for the Cherry MX switch support 4 × M3×8 screws for the Arduino and MOSFET supports 2 × M2×4 screws for the front light cover Total screw requirements: 7 × M2×104 × M3×8 2 × M2×4 The front white-light cover should be printed using white, transparent or translucent filament. The red connection LED does not require a diffuser or separate cover. Estimated component cost When calculating only the quantity of each component actually used and choosing affordable MX-compatible switches: Pro Micro USB-C: approximately €5.009 affordable MX-compatible switches: approximately €3.60 2 IRLB8721 MOSFETs: approximately €1.20 Red LED: approximately €0.10 5 cm white COB strip: approximately €0.30 4 resistors: approximately €0.10 Complete screw set: approximately €1.20 Wire and heat-shrink tubing: approximately €0.50 USB-C data cable: approximately €2.50 Estimated total: approximately €15. This estimate does not include: 3D-printed partsFilament Tools Solder Shipping costs Unused components remaining from multipacks Key wiring Each mechanical switch is connected between its assigned Pro Micro pin and the common GND connection. Key 1 → D4Key 2 → D3 Key 3 → D2 Key 4 → D7 Key 5 → D6 Key 6 → D5 Key 7 → D10 Key 8 → D9 Key 9 → D8 The firmware uses the Pro Micro’s internal INPUT_PULLUP resistors. No external resistor is required for the nine switches. All grounds must be connected together. Lighting wiring The red connection LED and white front light are controlled independently using two IRLB8721 MOSFETs. Red connection-light MOSFET gate → A3/D21White key-feedback MOSFET gate → TX/D1 For each MOSFET: Connect the assigned Arduino output to the MOSFET gate through a 100 Ω resistor.Connect the MOSFET source to GND. Connect the MOSFET drain to the negative side of the light. Connect the positive side of the light to 5 V. Make sure the lights and Arduino share a common ground. With the printed face of the IRLB8721 pointing toward you: Pin 1 → GatePin 2 → Drain Pin 3 → Source The red LED uses two 100 Ω resistors connected in series, providing a total resistance of approximately 200 Ω. The white COB strip must be a 5 V model with integrated current limiting. Do not add another series resistor if the strip is designed to operate directly from 5 V. No additional MOSFET gate pull-down resistor is used in the validated HCD assembly. How the lights work The red LED does not simply indicate that the Arduino is receiving power. It turns on only when: The application detects the HCDCommunication with the computer is working The application heartbeat is active The application regularly sends an HCD_PING message, and the controller replies with HCD_PONG. If the application is closed or stops responding, the red connection LED turns off after approximately three seconds. The white front light turns on when any key is pressed, but only while the HCD is connected to the application. If several keys are held simultaneously, the white light remains on until every key has been released. A minimum lighting duration can also be configured in the application. The brightness of the red connection LED and the white feedback light can be adjusted independently. Firmware installation Arduino IDE is not required. The official HCD firmware and flashing tools are included in the desktop application. Installation procedure: Print all required HCD parts.Assemble the enclosure and switch support. Complete the wiring according to the supplied diagram. Install the HackMan3D Control Deck application on Windows or macOS. Connect the Pro Micro using a USB-C data cable. Open the firmware manager in the application. Select the HCD firmware. Click Install firmware. Wait for the upload and automatic reconnection. Create a profile and assign actions to the nine keys. Users do not need to install Arduino IDE, AVRDUDE or any additional development software. Using the application The desktop application provides a visual representation of the physical controller. To configure a key: Select or create a profile.Click one of the nine keys in the visual preview. Open the short-press tab. Choose an action. Optionally configure a different long-press action. Test the action directly from the editor. Depending on the selected action, the application can automatically display the name and icon of an application or website. You can also drag an application directly from Finder or Windows Explorer onto a key. Available application features The Windows and macOS application includes: Automatic HCD detectionVisual 3D controller preview Short-press and long-press configuration Automatic saving of selected actions Action testing Conflict detection Profile creation and duplication Profile import and export Complete backup and restoration Application drag-and-drop Automatic application icon extraction Website icon retrieval Custom icons Integrated firmware installation Firmware update notifications Diagnostic page Real-time key activity display Real-time connection and feedback-light display Adjustable minimum feedback-light duration Independent lighting brightness controls Background operation Optional local usage statistics Multiple interface languages The application does not record the content of shortcuts, typed text, website addresses or application names in its optional statistics. Background operation The application must remain open for the HCD to execute computer-side actions and maintain its heartbeat connection. It does not need to remain visible on the desktop. On macOS, the application can remain active in the menu bar. On Windows, it can remain active in the notification area. The main window can therefore be hidden while profiles, shortcuts and lighting continue to work. macOS permissions Some system actions and keyboard shortcuts require macOS Accessibility or Automation permission. If a shortcut does not work: Open macOS System Settings.Go to Privacy & Security. Open Accessibility or Automation. Enable HackMan3D Control Deck. Restart the application if necessary. These permissions are controlled by macOS and are required for the application to send keyboard shortcuts and system commands. About the project The HackMan3D Control Deck is designed, developed, tested and shared free of charge. The project includes: The 3D enclosure design52 ready-to-print custom keycaps The blank, editable keycap STEP file Mechanical prototypes Electronics testing Arduino firmware Windows application macOS application Integrated firmware installation Automatic device detection Profile management Shortcut and system-action support Firmware and application updates Interface translations Wiring diagrams Assembly documentation Ongoing testing and improvements Feedback is extremely valuable. If you encounter a problem or have an improvement idea, contact me at: hackman3d.pro@gmail.com Community support and donations The HackMan3D Control Deck is shared free of charge. Donations are completely optional, but they help support: Electronic componentsPrototype manufacturing Test prints and failed iterations Development boards and displays Windows and macOS testing Firmware development Application development Documentation Future HCD versions The application contains one community progress bar ranging from 0% to 100%. The first milestone represents the development of HCD Plus. The final milestone represents the development of HCD Pro. HCD Pro progress begins only after the HCD Plus milestone has been reached. Users can only see the resulting percentage. Donation amounts and financial targets are never displayed. The public update file contains only a percentage. The source code does not expose donation totals. The application does not collect or process payments. The support button only opens the external HackMan3D PayPal page. Support the project here: https://paypal.me/Hackman3D You can also help without making a donation by: Posting your completed HCDSharing the project Leaving a comment Reporting a problem Suggesting improvements Following HackMan3D on social media Creating tutorials or demonstration videos Creating and sharing your own custom keycaps Every build, share, comment and piece of feedback helps the project move forward. Upcoming projects HCD Plus — In development HCD Plus is planned to include: 12 physical mechanical keysUp to 24 functions using short and long presses 2 clickable rotary controls Speaker-volume control Microphone-volume control Brightness control Red connection indicator White action-feedback light Configuration through the same Windows and macOS application Integrated firmware installation HCD Pro — In development HCD Pro is planned to include: A 7-inch capacitive touchscreen28 programmable touch buttons with one vertical slider, or 24 programmable touch buttons with two vertical sliders Application and action icons displayed directly on the screen Profiles and icons synchronized over USB Customizable screen colors Speaker, microphone and brightness sliders White action-feedback light Configuration through the same Windows and macOS application Integrated firmware installation These versions are still development projects. The standard HCD remains the recommended model to build. Downloads Download the latest Windows and macOS versions of the HackMan3D Control Deck application: https://github.com/HackMan3D/Hackman3D-Control-Deck/releases/latest Source code, firmware and technical documentation: https://github.com/HackMan3D/Hackman3D-Control-Deck HackMan3D links TikTok: https://www.tiktok.com/@hackman3d Instagram: https://www.instagram.com/hackman_3dprint/ YouTube: https://www.youtube.com/@hackman3D Contact: hackman3d.pro@gmail.com Support: https://paypal.me/Hackman3D Thank you to everyone who prints, tests, comments, shares or supports this project. Every contribution helps improve the HCD and develop its future versions. #HackMan3D #ControlDeck #HCD #MacroPad #Arduino #ProMicro #ATmega32U4 #DIY #OpenSource #3DPrinting #CrealityCloud #Maker #Electronics #MechanicalKeyboard #Windows #macOS
Tags
Diseñador
HackMan3D