
ADHD Checklist Keychain
Peso
18g
Tiempo
39m
Precio
Cotiza este producto por WhatsApp
Contáctanos y te damos el precio según color y acabado
Las dimensiones dependen del diseño. Confirmamos las medidas exactas por WhatsApp.
Descripción
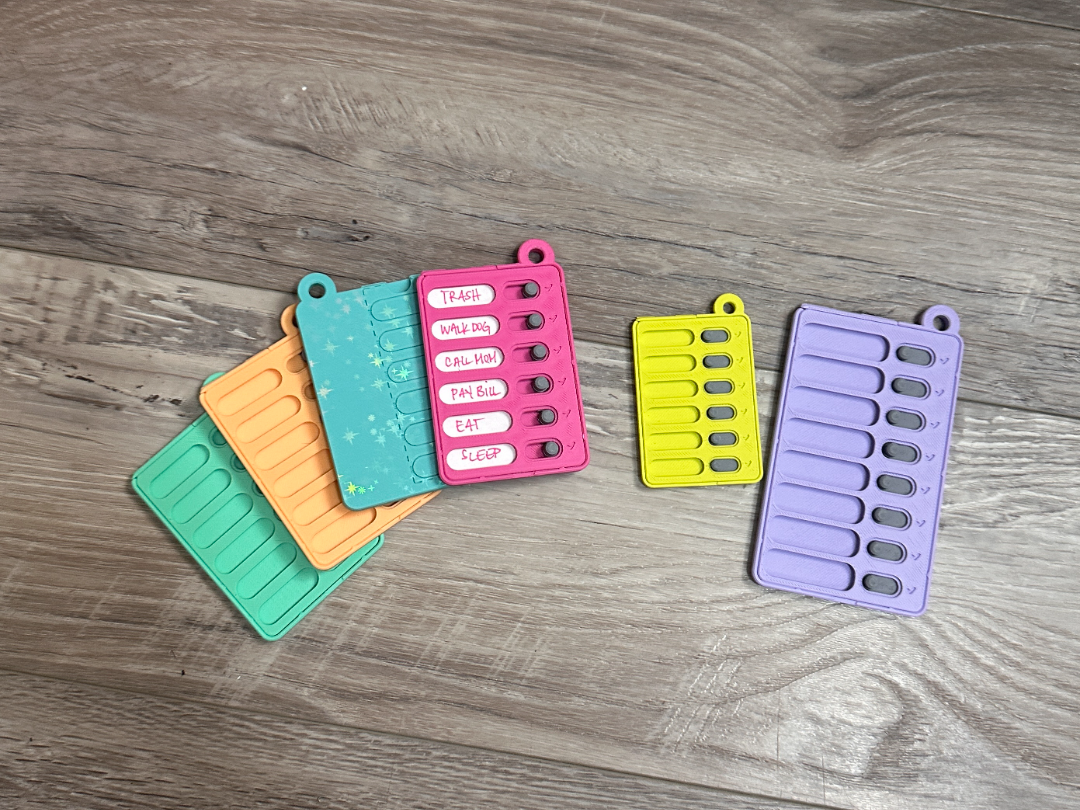
ADHD Checklist Keychain- A keychain-sized checklist with sliding checkboxes that actually click, and a paper strip you can rewrite every week. Three sizes, small, medium and large! Everyone loves apps these days. Apps, apps, apps! But every single app designer has forgotten one fundamental problem with the ADHD brain: an app requires me to remember to open the damn thing. So I made this instead. It lives on my keys. It cannot be closed, minimized, or buried under 40 notifications. What you get ✅ Sliding checkboxes with a real click. Your accent color appears in the window, which is a stupid amount of dopamine for a 4 mm piece of plastic. 📝 A paper strip that drops in the top and pulls back out, so today's list is not permanently your list. 🖨️ One printable refill sheet with strips for all three sizes on a single page, included as a PDF. ✏️ A blank template debossed into the BACK of the card, for when you have no printer and a list that needs to exist right now. 🔑 Three sizes: small (44 x 64 mm), medium (55 x 79 mm), and large (62 x 114 mm, 8 rows instead of 6). The back is the template My favorit part. A dashed groove marks the cut line, and the boxes inside it line up with the windows on the front. Grab any scrap of paper, lay it on the back, cut on the groove, write in the boxes, slide it in. A receipt, an envelope, whatever is in the glove box. Printing Card body in your base color, sliders in a bright accent. That accent is what appears when a row is done. With an AMS, both files on one plate, a color per object. One print. PLA, no supports, exactly as they land on the plate. 0.4 nozzle at 0.16 mm layers as shipped. 0.2 nozzle at 0.10 mm if you have one: same files, crisper detents, sharper click. DO NOT SCALE THESE FILES IN YOUR SLICER. The snap nubs are sized to your nozzle, not to the card, so shrink it and they collapse into one mushy layer and the lid stops holding. (Ask me how I know.) Assembly Sliders into their pockets button up, button toward the left end of the slot. Press the front plate on, tab at the TOP edge, until it clicks all the way around. Split ring through the loop. To reopen, fingernail into the notch on the bottom edge. The first few clicks Expect to finagle the sliders a little the first time. That is normal, not broken. Work them back and forth a few times and they break in. As long as you did not print at super draft speed they will work, it might just take a few tries to get them going. The paper strips One page has strips for all three sizes, so you only need the one sheet. Print it at 100 percent. Do not let it "fit to page." There is a 100 mm ruler printed at the bottom, so you can measure it and actually know. Cut along the dashed lines. The strips share their cut lines, so every cut finishes two at once. Straight edge and a blade, not scissors. Every strip has a grey bar at one end that says TOP. That is the end that goes into the card first, and the bar disappears under the card once it is in. The bubbles are drawn slightly larger than the windows on purpose, so the outlines hide under the plate. Notes Medium and large use the exact same sliders and swap freely. Small does not talk to either of them; it is an 80 percent card and its own little island. Hope it keeps at least one thing from falling out of your head today! 😊
Tags
Diseñador
Tifferzzz