
P2S FanDuct - Coanda effect.
Peso
9g
Tiempo
54m
Precio
Cotiza este producto por WhatsApp
Contáctanos y te damos el precio según color y acabado
Las dimensiones dependen del diseño. Confirmamos las medidas exactas por WhatsApp.
Descripción
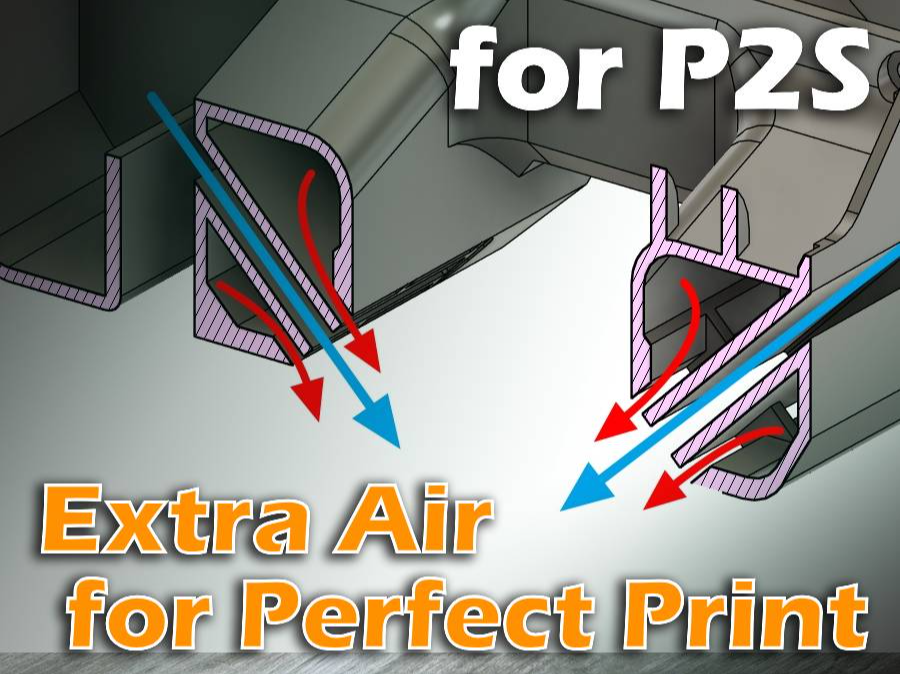
FON FanDuct Series Printer TYPE Description P1S Fanduct ReplacementEnhanced cooling performance using the Coanda effectP2S Fanduct ReplacementEnhanced cooling performance using the Coanda effectX1 Fanduct ReplacementEnhanced cooling performance using the Coanda effectH2D Fanduct ReplacementEnhanced cooling performance using the Coanda effectH2D Fanduct SockBlock the fan duct outlet leading to the left nozzle to concentrate all cooling performance on the right nozzle.K1(Creality) Fanduct ReplacementEnhanced cooling performance using the Coanda effectThere are various discourses on cooling, and there are various existing duct design ideas, but this model was designed with a completely new approach. All existing designs are focused on how accurately or in which direction the wind blows. This design blows more air with the same fan. How is that possible? Have you heard of the Coandă Effect? This is a fluid dynamics term that refers to the phenomenon in which when there is a flow of a fluid, nearby fluids stick together and are dragged along by the flow, ultimately amplifying the flow of the fluid. The most common examples are Dyson hair dryers and fans. The wind created by the fan comes out of a thin circular ring, but by following the flow of the wind, a larger wind is generated in the center of the ring. Coanda FanDuct for P2S 💡 How It Works This cooling duct utilizes the Coanda Effect to maximize airflow: High-Velocity Core Airflow (Red Line): Internal fan air travels along the engineered curved surface inside the duct. Ambient Air Entrainment (Blue Line): The low-pressure zone created by the primary jet draws in additional surrounding air. Massive Flow Amplification: Combines forced fan output with entrained ambient air, providing superior cooling right at the extruding layer. I have owned or used almost every BambuLab printer. The test results for the P2S were the worst of all the BambuLab printers I have tested. This naturally led me to create this model. The new model demonstrated the most significant improvement among all the fan ducts I have built so far. If you are dissatisfied with the cooling performance of your current P2S, I strongly recommend trying this model. No lengthy explanation is needed. Below are the results of the bridging test I conducted. Unlike the P1S, the fan duct on the P2S is not bonded to the toolhead cover. The fan duct can be easily detached by unscrewing two tiny screws, and this model is precisely and securely attached to the toolhead cover.
Tags
Diseñador
FunOrNothing