
Print Doctor v2: 12-in-1 Print Failure Diagnosis
Peso
113g
Tiempo
5h 30m
Precio
Cotiza este producto por WhatsApp
Contáctanos y te damos el precio según color y acabado
Las dimensiones dependen del diseño. Confirmamos las medidas exactas por WhatsApp.
Descripción
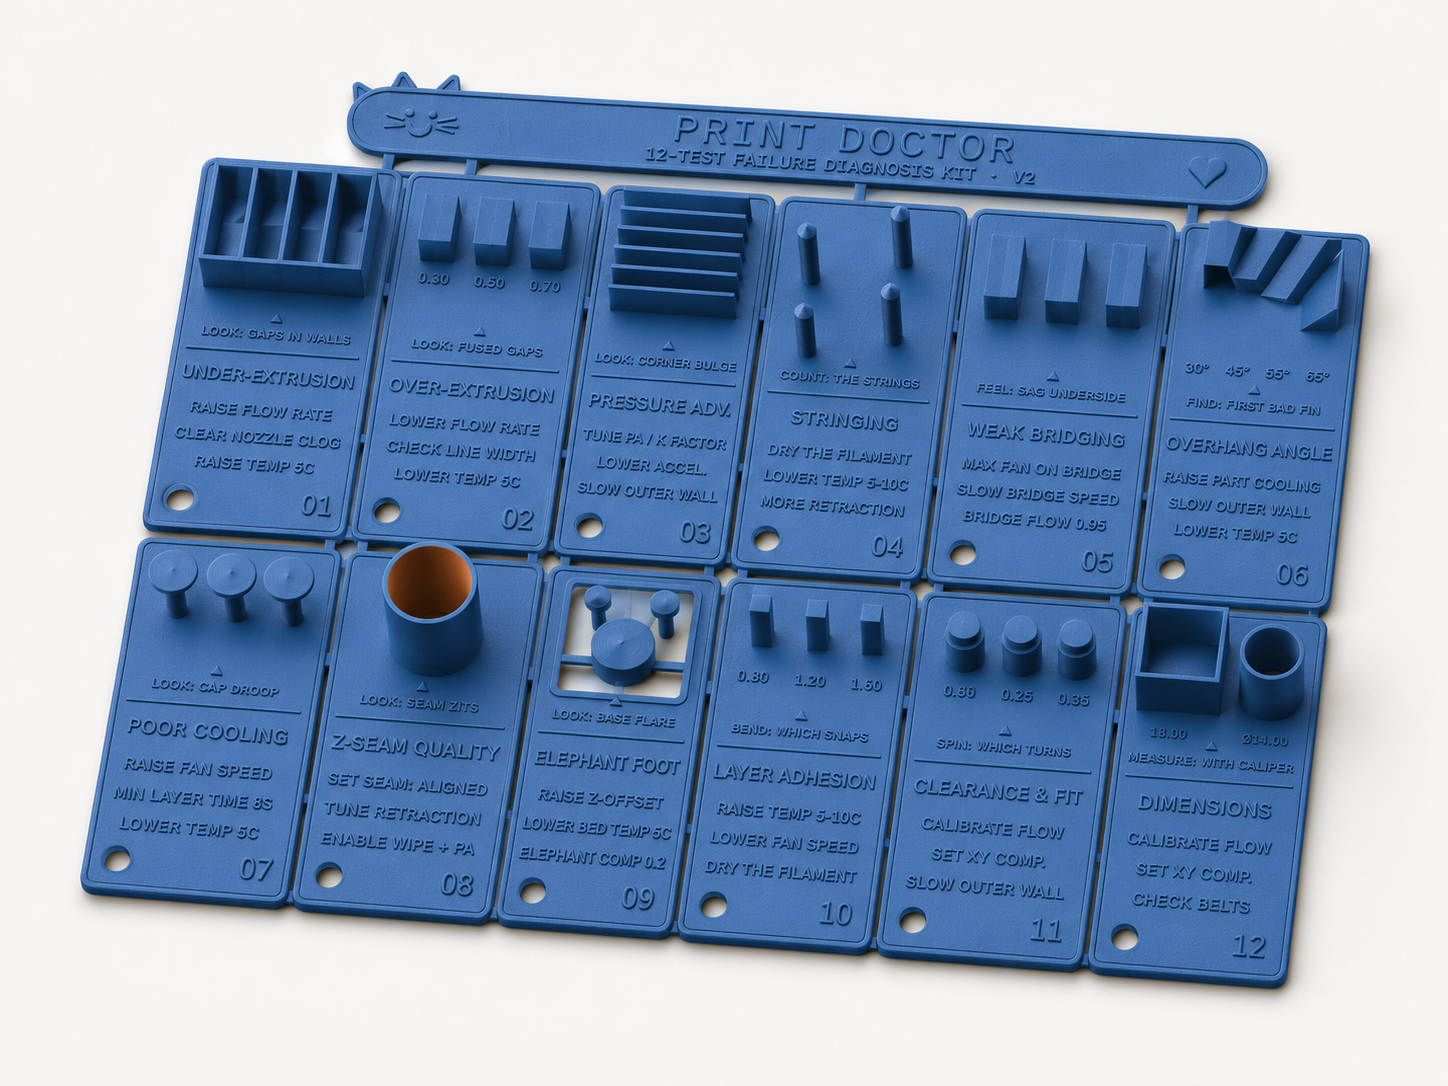
One print. Twelve failure checks. Every card tells you what to inspect, what the answer means, and the three settings to change next. Now fits the A1 mini. Boost Me Most calibration prints tell you that something is wrong. Print Doctor tells you what it means and what to do next — the diagnosis is printed right on the part, so you never have to go looking it up. What's new in v2 It fits your printer now. v1 was 204 × 180 mm, which meant A1 mini owners could not print it at all. v2 ships in three layouts: one full 239 × 179 mm sheet for 256 × 256 plates, plus Sheet A and Sheet B at 139 × 158 mm each, which fit a 180 × 180 plate with room to spare. Twelve tests, not ten. Three new cards: Overhang angle — four fins leaning at a labelled 30°, 45°, 55° and 65° off vertical. Find the first one whose underside breaks up: that is your printer's real overhang limit, and the number you should put in your support threshold. Clearance & fit — three print-in-place rings around capped posts at 0.15, 0.25 and 0.35 mm radial clearance. Try to spin each one. The tightest ring that still turns is the clearance you can trust in your own designs. Dimensions — a 18.00 mm square tube and a Ø14.00 mm round tube, both with a two-line wall. Measure the outside, the inside and the wall thickness with calipers to separate a flow error from an XY-compensation error. It adapts to your nozzle. Every gap, rib, wall and slot is derived from your nozzle diameter, so the tests still discriminate on a 0.6 mm or 0.2 mm nozzle instead of being tuned only for 0.4 mm. Better as a keepsake. Every card carries its number and a 4.5 mm hole, so once you snap the sheet apart the twelve cards go straight onto a binder ring and live next to the printer as a flip-through reference deck. The breakaway tabs are thinner than v1's and snap cleanly instead of tearing. Sharper geometry. The Z-seam cup is now genuinely round. In v1 it was a 48-sided polygon, and those facet lines could be mistaken for the seam artifacts the card is supposed to reveal. The cat-shaped Print Doctor nameplate, the mushroom cooling test and the elephant-foot paw all survive the rebuild. The twelve tests #CardWhat you doWhat it tells you01Under-extrusionLook for gaps in the single-line frame and three ribsFlow, clog, or temperature too low02Over-extrusionFind the smallest labelled slot still openHow much excess flow is closing your gaps03Pressure advanceLook at the ten hard cornersBulging after turns, thinning before them04StringingCount the strands between four spiresRetraction, temperature, wet filament05Weak bridgingFeel the underside of the 10, 18 and 26 mm spansLongest span your cooling can hold06Overhang angleFind the first fin that breaks upYour real overhang limit in degrees07Poor coolingLook at the droop on three mushroom capsWhether the layer below is setting in time08Z-seam qualityLook down the seam line of a smooth cupZits, gaps, inconsistent layer starts09Elephant footLook at the base flare of the pawFirst-layer squish and Z offset10Layer adhesionBend the 0.80, 1.20 and 1.60 mm bladesWhether layers split or the plastic yields11Clearance & fitSpin the three ringsThe tightest clearance you can design to12DimensionsMeasure with calipersFlow error vs XY-compensation error The paw on card 09 prints directly on the build plate through a window in the card, so the first layer is never hidden by a card floor underneath it. Which file do I print? Your printerPrint thisBambu A1 / P1S / P1P / X1C, Prusa MK4, Ender 3 (220+)print_doctor_v2_full.stl — one sheet, all 12 cardsBambu A1 mini, or any 180 × 180 plateprint_doctor_v2_mini_A_cards_1-6.stl then ..._mini_B_cards_7-12.stl How to use it Slice with the profile you actually want to diagnose — not a specially tuned calibration profile. The point is to test what you print with every day. Supports off. The unsupported features are the test. Brim off if you can. A brim hides elephant foot. Print flat, exactly as supplied. Work through the cards. Each raised LOOK / FEEL / COUNT / BEND / SPIN / MEASURE line tells you what to do with that specimen. Use the three printed adjustments as your shortlist. Change one setting at a time and reprint just the card you are chasing. Snap the sheet apart, put the twelve cards on a binder ring, keep them by the printer. The printed suggestions are starting points, not laws. Material condition, hardware wear, motion settings and slicer behaviour can all produce similar-looking symptoms. Recommended print settings Material: PLA for the first diagnostic print Nozzle: 0.4 mm (the model is parametric if you run something else) Layer height: 0.20 mm — this matters, the print-in-place rings on card 11 are designed around a 0.2 mm air gap Walls: 2 Infill: 15 % Supports: Off Brim: Off where possible Orientation: Flat, as supplied Model dimensions FileFootprintMax heightFull sheet239.0 × 178.7 mm21.4 mmMini Sheet A138.9 × 158.2 mm21.4 mmMini Sheet B138.9 × 158.2 mm19.2 mm One connected, manifold print in every case, with optional breakaway cards. The three rings on card 11 print loose by design — that is the test. Parametric The OpenSCAD source is included and is set up for the MakerWorld Parametric Model Maker. Adjustable: sheet layout, nozzle diameter, layer height, label style (raised or flush inlay), part split for multi-colour, breakaway tab thickness, and the binder-ring hole.
Tags
Diseñador
dpappo